Every time you hand out your main Wi-Fi password, you’re handing out a key to your entire home network — your NAS drive, your security cameras, your work laptop, your kids’ tablets. All of it. Setting up a guest network takes less than five minutes on most routers, costs nothing, and is one of the single best security improvements you can make without buying a single piece of new hardware.
This guide walks you through how to set up a guest network on every major router brand, what settings actually matter, and — most importantly — how to verify it’s doing its job.
What Is a Guest Network?
A guest network is a separate Wi-Fi access point broadcast by your router alongside your main connection. Devices that connect to it get full internet access but are walled off from your primary local network — they can’t see your computers, shared drives, printers, or other devices. Each network gets its own name (SSID) and its own password. The router handles the separation automatically through a process called network isolation, which means guest devices live in their own subnet and have no path to your main one.
It’s the digital equivalent of having a separate entrance to your home. Visitors get Wi-Fi. They don’t get access to everything else.
Why You Need One in 2026
Here’s the thing that most people don’t realize: in 2026, the biggest reason to set up a guest network isn’t actually for guests. It’s for your smart home devices.
Your smart TV, robot vacuum, video doorbell, and Wi-Fi thermostat are all — to put it charitably — not paragons of cybersecurity. Many run outdated firmware with known vulnerabilities. If one of those devices gets compromised, and it’s sitting on your main network, an attacker can use it as a stepping stone to everything else.
Put your IoT devices on the guest network instead. They still work exactly the same. But if one gets hacked, it’s contained.
That said, the guest use case is still very real. When a friend connects to your main Wi-Fi, their device joins the same local network as your personal computers. If their device carries malware, that malware has a direct path to your other devices. Lateral spread — one device infecting another quietly — is exactly how home network breaches happen. A guest network stops that cold.
Also, practically speaking: a guest on your network who decides to stream 4K video can eat up enough bandwidth to make your video calls unwatchable. A guest network lets you cap their speeds independently. More on that in a moment.
What You Need Before You Start
Before you log in to your router, have a few things ready:
- Your router’s IP address — usually
192.168.1.1or192.168.0.1. Check the sticker on the back or bottom of your router. - Your admin username and password — also on the router sticker. If you’ve never changed it, it’s often
admin/adminoradmin/password. (And if you haven’t changed these defaults yet, do that first — it takes 30 seconds and matters a lot.) - A new guest network name (SSID) — pick something distinct but not personally identifying.
Smith_Guestworks.Smith_Home_Guest_Networktells strangers your last name. Keep it simple. - A guest password — make it something you can share verbally without spelling out fifteen special characters.
Bluechair88is fine.X!9#mQ@zis technically stronger but you’ll be typing it for visitors every time.
How to Set Up a Guest Network: Universal Steps
These steps work on virtually any modern home router. The exact menu labels differ by brand, but the process is the same.
- Open a web browser on any device connected to your router — laptop, phone, tablet. It doesn’t matter which browser.
- Type your router’s IP address into the address bar (not the search bar). Common addresses:
192.168.1.1,192.168.0.1, or10.0.0.1. - Log in with your admin credentials. These are on the router label. If you’ve changed them and forgotten, you’ll need to reset the router to factory defaults.
- Find the Guest Network section. Look under Wireless Settings, Wi-Fi Settings, or a dedicated “Guest” tab. Most modern router firmware puts it front and center.
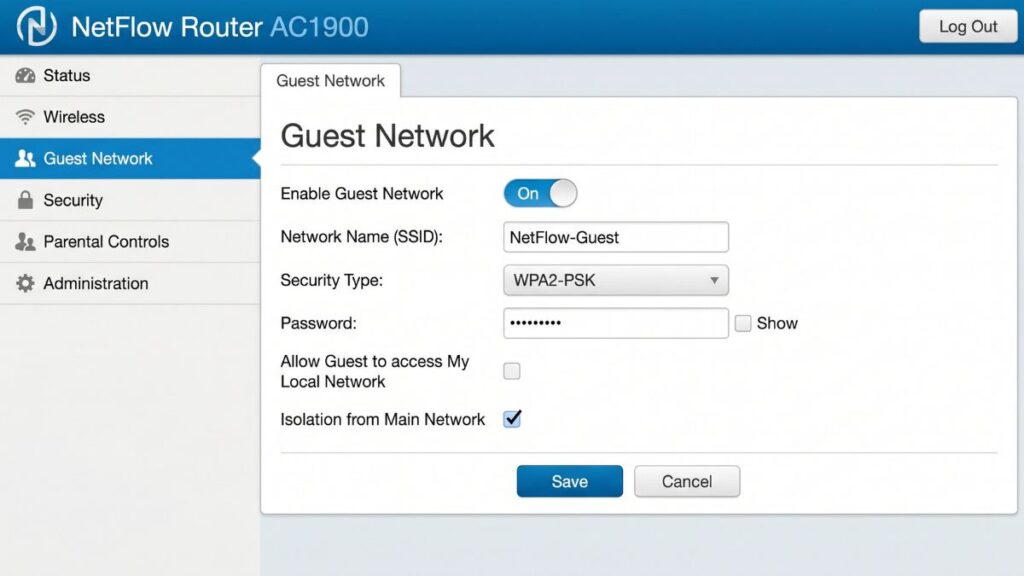
- Enable the guest network by toggling it on or clicking Enable.
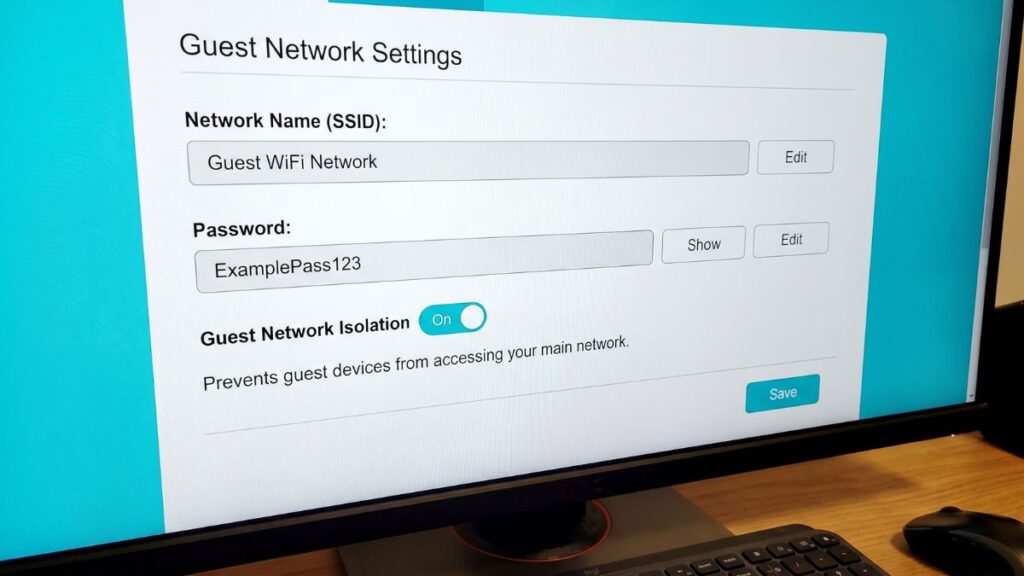
- Set the network name (SSID) — something distinct from your main network.
- Set a strong password — different from your main Wi-Fi password. Always different.
- Choose WPA2 or WPA3 as your security type. Never choose WEP or open (no security). WPA3 is preferred on routers that support it — it’s the current standard and especially important on a shared-password network.
- Enable client isolation / AP isolation if the option is visible. This prevents guest devices from seeing or talking to each other, not just from seeing your main network.
- Save your settings and wait for the router to apply them.
- Test it — connect a phone to the new guest network and verify you can access the internet.
That’s the core setup. Now let’s go brand by brand for the specifics.
Step-by-Step by Router Brand
TP-Link (Archer Series)
- Go to
192.168.0.1in your browser and log in. - Select Advanced at the top of the dashboard.
- Click Guest Network in the left sidebar.
- Toggle on the 2.4 GHz and/or 5 GHz guest band.
- Set a network name and password.
- Under Advanced Settings, enable Isolate Clients to prevent guest devices from seeing your main network.
- Optionally, set a bandwidth limit under the same menu — great for keeping guests from saturating your connection.
- Click Save.
ASUS (RT Series and ZenWiFi)
- Navigate to
192.168.1.1orhttp://www.asusrouter.comand log in. - From the main dashboard, click Guest Network in the sidebar.
- Select the band you want (2.4 GHz or 5 GHz). ASUS will auto-generate a network name and password — change both.
- Set the connection time limit if you want guest access to expire automatically (this is an underused ASUS feature worth enabling).
- Enable Access Intranet: No to prevent guests from seeing your local devices.
- Click Apply.
Note: If your ASUS router is in Access Point (AP) mode, the guest network isolation settings may not be available. That’s a known limitation — the front router controls the network in that mode.
NETGEAR (Nighthawk and Orbi)
- Open a browser and go to
http://www.routerlogin.netor192.168.1.1. - Log in — the default username is
admin, and the password is whatever you set during initial setup. - From the Basic home screen, click Guest Network.
- Scroll to the 2.4 GHz or 5 GHz section.
- Make sure Enable SSID Broadcast is checked — this makes your guest network visible and discoverable.
- Enter a guest network name. The defaults (
NETGEAR-GuestandNETGEAR-5G-Guest) work but are worth changing to something less generic. - Select WPA2 as the security option.
- Enter a password and click Apply.
Google Nest / Google Home
Google handles this through the app, not a browser admin panel.
- Open the Google Home app on your phone.
- Tap Wi-Fi, then Devices, then Network Settings.
- Tap Guest Network and turn it on.
- Enter a network name and password (a password is required — you can’t create an open guest network through Google Home).
- Under “Shared Devices,” select any smart home devices you want guests to be able to control — like a Chromecast if you want them to cast to your TV.
- Tap Save.
One useful feature: Google lets you share the guest network password via text, email, or other apps directly from the Home app. You can also display the credentials on a Nest display by asking “Hey Google, what’s my guest Wi-Fi password?”
Amazon Eero
- Open the Eero app on your phone.
- Tap the menu icon and select Network Settings.
- Tap Guest Network and toggle it on.
- Set a name and password.
- Eero isolates guest devices by default — there’s no separate toggle needed.
- Tap Save.
Settings That Actually Matter
Most guides tell you to just flip the guest network on and walk away. But a few specific settings make a significant difference.
Client Isolation (also called AP Isolation) This prevents guest devices from communicating with each other, not just from reaching your main network. On a home network, it’s mostly a privacy measure. On a business network, it’s essential. Enable it if you see the option.
WPA3 vs. WPA2 WPA3 is the current recommended standard per CISA’s home network security guidance. It’s especially valuable on guest networks where you share the password widely — WPA3 uses individualized data encryption so one guest can’t decrypt another guest’s traffic even if they know the password. If your router supports it, use WPA3-SAE. If not, WPA2-AES is still solid. Never use WEP or WPA-TKIP — both are trivially broken.
Bandwidth Throttling (QoS) Most TP-Link and ASUS routers let you set a bandwidth cap per SSID or per device. Cap guest traffic at 10–20 Mbps and your main network stays snappy no matter what guests do. This is the setting most people don’t know exists.
Session Time Limits ASUS routers let you set a connection time limit — guests get kicked off after a set number of hours. Useful if you’re hosting a party or Airbnb and don’t want someone connected for three weeks.
SSID Broadcast Keep this on. Hiding your SSID doesn’t add real security (the network is still discoverable with basic tools) and just makes it harder for guests to connect.
How to Verify Your Guest Network Is Actually Isolated
Most people set up a guest network and assume it’s working. Here’s the thing — sometimes it isn’t. Some routers, especially older ones or those in bridge/AP mode, have guest network features that don’t properly isolate traffic.
Here’s how to actually check:
- Connect a phone or laptop to your guest network.
- Try to access your router’s admin panel by typing its IP address (
192.168.1.1etc.) in a browser. If you can reach it from the guest network, that’s a problem — guests shouldn’t be able to access router settings. - Download the Fing app (free) on the guest-connected device. Run a network scan. You should see zero devices from your main network. If your main network devices show up, your isolation isn’t configured correctly.
- Try pinging a device on your main network (like your desktop computer’s local IP). It should time out with no response.
If isolation isn’t working, check whether your router is in Access Point mode — that disables guest network isolation on many models. You may need to configure the guest network on the primary router instead.
Smart Devices to Put on Your Guest Network
This is the 2026 use case that gets underplayed. Beyond actual guests, consider moving these device types to your guest network:
| Device Type | Put on Guest Network? | Reason |
|---|---|---|
| Smart TVs | Yes | Often run outdated firmware; don’t need LAN access |
| Robot vacuums | Yes | Frequently targeted in IoT attacks |
| Video doorbells | Yes | Security cameras on main network = risk |
| Smart plugs/bulbs | Yes | Low security, no LAN need |
| Gaming consoles | Maybe | Need LAN if you want local multiplayer |
| Work laptops | No | Needs full network features |
| Printers | No | Main network devices need to reach them |
| Personal phones/tablets | No | Should stay on primary network |
| Smart speakers (Alexa, Google) | Maybe | Guest network limits local device control |
A good rule of thumb: if a device just needs internet access and doesn’t need to talk to other devices on your network, put it on the guest SSID. If it needs to interact with other local devices (like a printer or a gaming console for local play), keep it on the main network.
Common Mistakes to Avoid
Using the same password for both networks. Yes, people do this. It defeats most of the benefit. Use a completely different password.
Never changing the default guest SSID. A network named NETGEAR-Guest tells anyone scanning nearby that you haven’t touched your router settings since you plugged it in.
Skipping the isolation verification step. Setting up the network isn’t the same as confirming it’s actually isolated. Check it (see above).
Leaving the guest network on permanently when you don’t need it. An unused network is an unnecessary attack surface. Turn it off when you have no guests and no IoT devices on it.
Using the guest network for IoT devices and then giving guests the same password. If your security cameras are on the guest network, don’t hand that password out publicly. Create two separate networks if your router supports it — many modern routers allow multiple guest SSIDs.
Not updating router firmware. Firmware updates patch vulnerabilities in the guest network isolation itself. Check for updates every few months — most modern routers have an auto-update option in the admin panel.
Troubleshooting
Guest network option doesn’t appear in my router settings Some older or entry-level routers don’t support guest networks at the firmware level. Check your router’s spec sheet or the manufacturer’s support site. If yours doesn’t support it, it may be time to upgrade — most routers made in the last five years include guest network functionality as standard.
Guest devices can still see my main network First, confirm isolation is actually enabled (some routers label it differently — look for “client isolation,” “AP isolation,” or “access intranet: no”). Second, check whether your router is running in AP or bridge mode — guest network isolation is often disabled in these modes. Third, if the problem persists, try a factory reset and reconfigure from scratch.
Guests can connect but can’t reach the internet Don’t panic — this is usually a DNS or DHCP issue. Make sure the guest network has DHCP enabled (it should be on by default). Try forgetting the network and reconnecting. If it still fails, log into the admin panel and confirm the guest SSID is bound to the WAN/internet interface, not the LAN.
Guest network shows up but guests can’t connect Check whether SSID broadcast is enabled. If you accidentally turned it off, the network is hidden and requires manual configuration to connect. Also confirm the password is correct — guest network passwords are case-sensitive.
Guest network slows down my main connection Enable QoS (Quality of Service) or a per-SSID bandwidth cap in your router settings. Limiting guest bandwidth to 10–20 Mbps solves this for the vast majority of households.
Guest Network vs. Main Network
| Feature | Main Network | Guest Network |
|---|---|---|
| Internet access | ✅ | ✅ |
| Access to local devices (NAS, printers) | ✅ | ❌ (when isolated) |
| See other connected devices | ✅ | ❌ (with client isolation) |
| Access router admin panel | ✅ | ❌ |
| Bandwidth priority | High | Limited (configurable) |
| Best security encryption | WPA3 | WPA3 or WPA2 |
| Recommended for | Personal devices, work devices | Guests, IoT, smart home devices |
| Session time limits | No | Optional (ASUS, some others) |
FAQ
Not in any meaningful way for normal usage. Your router broadcasts an additional SSID, which adds a small overhead, but in practice it’s negligible. The only scenario where guest usage affects your main speed is if a guest is transferring large amounts of data — which you can prevent with a bandwidth cap in your QoS settings.
No — when properly configured with client isolation enabled and network separation active, guest devices cannot see, ping, or connect to anything on your main network. They can only reach the internet. Always verify this after setup using a tool like Fing.
Reasonably safe, yes — that’s the point of it. The guest network gives internet access without local network access. For extra protection, use WPA3 (which individually encrypts each device’s traffic) and enable client isolation so guests can’t see each other. Change the password periodically if you’ve given it out widely.
Set up both if your router supports it. The 2.4 GHz band has longer range and better wall penetration, making it more reliable for guests moving around your space. The 5 GHz band is faster but shorter range. Most devices will automatically connect to whichever band is stronger — and according to the Wi-Fi Alliance’s technical standards, modern Wi-Fi 6 and Wi-Fi 6E devices manage this selection automatically.
Yes, for the majority of smart home devices. Smart TVs, robot vacuums, video doorbells, and smart plugs all just need internet access — they don’t need to interact with your computers or personal devices. Putting them on the guest network means if one gets compromised, it can’t spread to the rest of your network. Printers and gaming consoles are exceptions because they often need to communicate with other local devices.
Check your router manufacturer’s support page to confirm — some models require a firmware update to unlock the feature. If your hardware genuinely doesn’t support it, consider an upgrade. Most routers released after 2019 include guest network support as a standard feature, and current mid-range models from TP-Link, ASUS, and NETGEAR all include it.
The quickest method: most modern smartphones can display a QR code for any saved Wi-Fi network. On iPhone, go to Settings > Wi-Fi, tap the network name, and select Share Password. On Android, go to Settings > Network & Internet > Wi-Fi, tap the network, and select Share. Your guests scan the code and connect without typing anything.