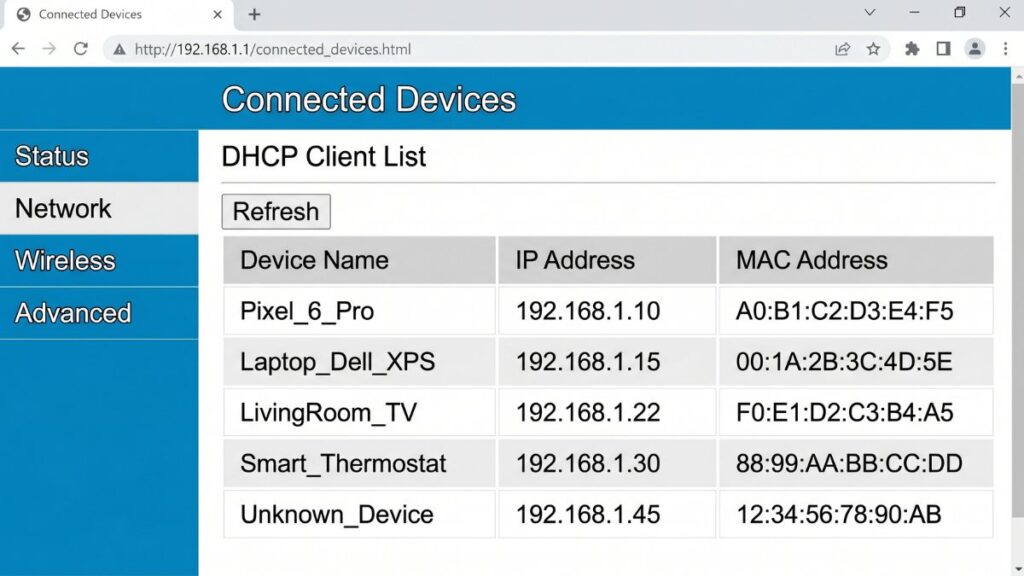
Something feels off. Your internet is slower than usual, or you just had one of those moments where you wondered — has anyone been using my Wi-Fi without asking? Maybe you handed your password to a houseguest three months ago and never changed it. Maybe a neighbor figured out your old router password. Maybe it’s just your smart TV showing up with a cryptic name you don’t recognize.
Whatever brought you here, checking who’s on your network takes less than two minutes and doesn’t require any tech expertise. This guide covers five methods — from the simplest (your router’s admin panel) to the most thorough (a network scanner with MAC lookup) — plus how to identify devices with confusing names like “Espressif” or “Tuya,” and what to actually do when you find something you don’t recognize.
What You’re Actually Looking For
When you scan your network, every connected device shows up with three pieces of identifying information:
IP address — the local address your router assigned to the device, like 192.168.1.105. This changes every time a device reconnects (unless you’ve set up DHCP reservation).
MAC address — the hardware identifier burned into the device’s network card. Looks like B8:27:EB:3C:4D:5E. The first six characters identify the manufacturer.
Hostname / Device name — what the device calls itself on the network. Sometimes this is helpful (“Sarah-iPhone,” “DESKTOP-ABC123”). Often it’s cryptic (“Espressif,” “Amazon-Echo,” “Unknown”).
Your job is to match every device on the list to something you own. When the count doesn’t add up — or something shows up that you genuinely can’t explain — that’s when you dig deeper.
Method 1: Your Router’s Admin Panel (Works on Everything)
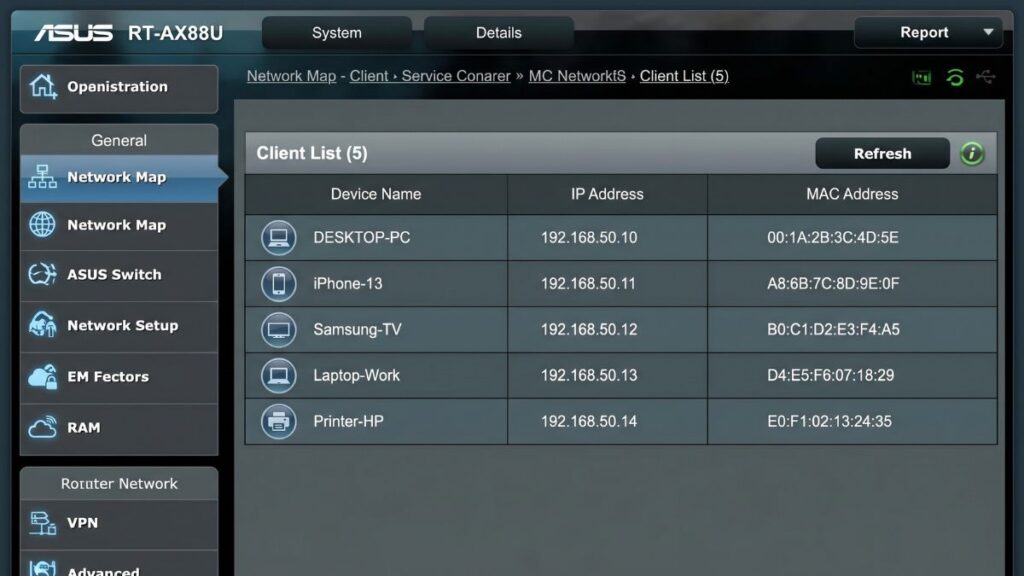
This is the most reliable method. Your router keeps a live record of every device it has assigned an IP address to. You don’t need to install anything.
Step 1: Log into your router’s admin panel.
Open a web browser and type your router’s IP address into the address bar — not the search bar, the address bar at the top. Common addresses:
- 192.168.1.1 — ASUS, NETGEAR, Linksys, most ISP gateways
- 192.168.0.1 — TP-Link, D-Link
10.0.0.1— Xfinity / Comcast gateways- 192.168.1.254 — AT&T gateways
Not sure which one is yours? On Windows, open Command Prompt and type ipconfig — look for Default Gateway. On iPhone, go to Settings > Wi-Fi > tap your network > look for Router. See find your router IP address for the full walkthrough.
Log in with your admin username and password. These are printed on the sticker on the back or bottom of your router. If you’ve forgotten them, check default router passwords for common credentials by brand.
Step 2: Find the connected devices section.
The exact location varies by router, but look for one of these labels:
- Connected Devices (ASUS, Linksys)
- Attached Devices (NETGEAR)
- DHCP Client List (TP-Link)
- Device List (D-Link)
- Client List (various)
- My Network (Verizon Fios)
Step 3: Review the list.
You’ll see each device’s hostname, IP address, and MAC address. Some routers also show the connection type (wired vs. wireless) and signal strength. Count the devices. Compare them against what you own.
One thing to know: most routers show only currently connected devices. If a device connected earlier today and then disconnected, it might not be on the list. ASUS and some NETGEAR models keep a history of recent devices — look for a “DHCP Lease” or “Connection History” tab if you want to see past connections.
Method 2: Your Router’s Mobile App
If you’d rather not deal with a browser, most major router brands have mobile apps that show connected devices in a cleaner interface — often with device icons and the ability to rename or block devices directly.
| Router Brand | App Name | Where to Find Devices |
|---|---|---|
| TP-Link (Archer) | Tether | Home screen → tap your router → Clients |
| ASUS | ASUS Router | Network Map → Client List |
| NETGEAR | Nighthawk | Home → Connected Devices |
| Linksys | Linksys | Wi-Fi → Connected Devices |
| Google Nest | Google Home | Wi-Fi → Devices |
| Amazon Eero | Eero | Home → tap your network → Devices |
| D-Link | D-Link Wi-Fi | Home → Connected Devices |
The app method has one real advantage over the browser: most of these apps let you tap a device and block it immediately, without navigating through nested menus. If you find something suspicious and want it off your network fast, the app is quicker.
Method 3: Command Line — Windows, Mac, and Linux
No router access needed. Your computer already knows what’s on the network — you just have to ask it.
Windows
ARP table (fastest):
- Press Windows key, type
cmd, press Enter. - Type
arp -aand press Enter.
You’ll see a table of IP addresses and their corresponding MAC addresses — every device your computer has recently communicated with on the network. The output looks like:
Interface: 192.168.1.105
  Internet Address      Physical Address
  192.168.1.1           b8-27-eb-3c-4d-5e   ← your router
  192.168.1.102         a4-c3-f0-11-22-33
  192.168.1.110         dc-a6-32-44-55-66
Limitation: arp -a only shows devices your computer has recently spoken to. It won’t catch every device on the network — just the ones that have exchanged packets with your machine. For a full list, use Method 1 or Method 4.
PowerShell (cleaner output of active devices):
Get-NetNeighbor -AddressFamily IPv4 | Where-Object {$_.State -ne "Unreachable"} | Format-Table IPAddress, LinkLayerAddress, State
This filters out dead entries and shows only devices that are currently reachable.
Mac
Open Terminal (Applications > Utilities > Terminal) and run:
arp -a
Same output as Windows — IP addresses and MAC addresses of recently seen devices. For a more complete scan:
nmap -sn 192.168.1.0/24
Replace 192.168.1 with your subnet if your router uses a different range (check your router’s IP — if it’s 192.168.0.1, use 192.168.0.0/24). This requires nmap to be installed (brew install nmap if you use Homebrew).
Linux
ip neighbor show
Or the classic:
arp -a
For a full subnet scan with nmap:
nmap -sn 192.168.1.0/24
Method 4: Free Network Scanner App (Fing)
Fing is the go-to network scanner for non-technical users, and honestly it’s useful even if you’re comfortable with the command line. The reason: Fing doesn’t just give you IP addresses and MAC addresses — it identifies devices by brand, model, and type using a device recognition database built over a decade of machine learning. That mystery MAC address that shows up as gibberish in the router admin panel shows up in Fing as “Amazon Echo Dot (4th gen)” or “Samsung Galaxy S24.”
How to use it:
- Download Fing from the App Store (iOS) or Google Play (Android) — it’s free.
- Make sure your phone is connected to the Wi-Fi network you want to scan.
- Open the app and tap Scan for devices.
- Within a few seconds, Fing shows every device on your network with its name, IP address, MAC address, and manufacturer.
Fing also lets you set up alerts for new device connections (helpful if you want to know the moment something unfamiliar joins your network) and save a snapshot of your network to compare against future scans.
The free version covers everything most home users need. The paid Fing+ plan adds continuous monitoring, device history, and network security checks — worth it for households where network security matters.
Desktop alternative: Angry IP Scanner Free for Windows, Mac, and Linux. Open source. Scans a range of IP addresses and reports hostnames, MAC addresses, and open ports. More powerful than Fing for technical users, less polished for everyone else.
Method 5: nmap — For the Thorough Check
nmap is the industry standard for network scanning. Free, open source, and extraordinarily powerful. For a home network audit, you mostly need one command.
Install nmap:
- Windows: download the installer from nmap.org
- Mac:
brew install nmapor download from nmap.org - Linux:
sudo apt install nmap(Ubuntu/Debian) orsudo dnf install nmap(Fedora)
Basic network scan:
nmap -sn 192.168.1.0/24
The -sn flag does a “ping scan” — it discovers which hosts are up without scanning ports. Fast, non-intrusive, and gives you a clean list of every responding device on your subnet.
Output looks like:
Nmap scan report for 192.168.1.1
Host is up (0.0020s latency).
MAC Address: B8:27:EB:3C:4D:5E (Raspberry Pi Foundation)

Nmap scan report for 192.168.1.102
Host is up (0.0031s latency).
MAC Address: A4:C3:F0:11:22:33 (Apple)

Nmap scan report for 192.168.1.110
Host is up (0.0055s latency).
MAC Address: DC:A6:32:44:55:66 (Raspberry Pi Trading)
nmap automatically resolves the MAC address OUI to a manufacturer name — so even without Fing, you get a reasonably useful device identification.
If your router IP is 192.168.0.1, use 192.168.0.0/24 instead. The subnet mask tells nmap which address range to scan.
How to Decode Cryptic Device Names
Here’s the thing nobody tells you: most “unknown” devices on your network are things you already own. They just don’t introduce themselves clearly. This is the section that will save you a panic attack.
The most confusing names and what they actually mean:
Espressif / ESP_XXXXXX / ESP-12F Espressif Systems makes the microcontroller chips inside a huge percentage of smart home products — smart plugs, light bulbs, robot vacuums, garage door openers, pet feeders, you name it. When a device uses an Espressif chip and doesn’t bother setting a friendly hostname (which many cheap IoT devices don’t), it shows up exactly as “Espressif” or “ESP_B7BCEF” in your device list. It’s almost certainly something you already own. The power-off method (see next section) is the fastest way to identify which device it is.
Tuya / TY_WR / SmartLife Tuya is a cloud platform used by hundreds of smart home device brands. When you buy a generic “Works with Alexa” smart plug or bulb from a no-name brand on Amazon, there’s a good chance it’s running on Tuya’s platform. These devices often advertise themselves as “Tuya,” “TY_WR,” or “SmartLife” — all the same thing. Not a threat. Just an IoT gadget with an unhelpful name.
Murata Manufacturing Murata makes Wi-Fi modules for Nintendo Switch consoles. If you see “Murata” and you own a Switch, that’s your Switch.
Amazon Technologies / Amazon-XXXX Amazon Echo devices, Fire TV sticks, Kindles with Wi-Fi, Ring cameras. Any Amazon product with a wireless connection shows up under the Amazon Technologies OUI.
AzureWave Technology Another Wi-Fi module manufacturer. Common in laptops and smart TVs, particularly some Sony and Toshiba models.
Hon Hai Precision / Foxconn Foxconn manufactures products for many companies including Apple, Xbox, PlayStation. If you see Hon Hai, it’s likely an Apple device or a gaming console.
Shenzhen / Shenzhen XXXXX Shenzhen is a city in China, not a manufacturer name. Devices that show up as “Shenzhen” are usually cheap IoT products from smaller Chinese manufacturers. Treat these the same as Espressif or Tuya — probably something you own, use the power-off method to confirm.
MAC address lookup — the definitive method:
When a device name tells you nothing, look up the first six characters of its MAC address. These characters identify the manufacturer (the OUI — Organizationally Unique Identifier).
- Copy the first six characters of the MAC address (e.g.,
B8:27:EB). - Go to maclookup.app or macvendors.com.
- Paste the characters and search.
- The result tells you which company made the network hardware.
A result of “Raspberry Pi Foundation” means it’s a Pi. “Samsung Electronics” means a Samsung phone or TV. “Amazon Technologies” means an Echo or Fire device. Once you know the manufacturer, matching it to something you own is usually straightforward.
The Power-Off Elimination Method
When the MAC lookup doesn’t give you enough to go on, this is the most reliable way to identify a mystery device — and it requires zero technical knowledge.
- Open your router’s connected devices list (Method 1) and note the device you can’t identify.
- Start turning off your devices one at a time — phones, tablets, laptops, smart speakers, smart plugs, TVs, consoles, everything.
- After each device powers off, refresh the connected devices list.
- When the mystery device disappears from the list, the last device you powered off is the one.
It sounds tedious, but it usually takes under five minutes. Most households can narrow it down quickly by thinking about which device categories match the manufacturer name from the MAC lookup.
One practical tip: smart home devices often stay connected even when the room is “off.” A smart plug in a power strip, a Wi-Fi thermostat you never think about, a streaming stick in a TV you haven’t used in weeks — all of these stay on the network. Start your elimination with smart home devices, not phones and laptops.
I Found an Unknown Device — Now What?
First: don’t panic. As covered above, most “unknown” devices are things you already own with unhelpful names. Work through the identification steps before assuming the worst.
If you’ve done the MAC lookup, tried the power-off method, and you genuinely cannot account for a device on your network, here’s how to respond:
Step 1: Write down the device’s MAC address. You’ll need it to block the device in your router settings.
Step 2: Note the timing. Does the device appear at a specific time of day? Is it on right now? Time-of-day patterns can help identify the device (a neighbor who’s home during the day, a visitor who was in your house recently, etc.).
Step 3: Check whether it’s accessing anything sensitive. An unauthorized device on your network is primarily a concern if it can see or interact with your other devices — which is less likely if you have client isolation enabled on your guest network. If your main network has no isolation, an unauthorized device is in the same subnet as your personal computers.
Step 4: Take action (see next sections).
How to Block a Device from Your Network
Via your router’s admin panel:
The exact steps vary by brand, but the general path is:
- Log into your router admin panel at 192.168.1.1 or 192.168.0.1.
- Navigate to the device in the connected devices list.
- Look for a Block, Deny, or Blacklist option — many modern routers let you block directly from the device entry.
- Alternatively, go to Wireless > MAC Filtering (or Access Control), add the device’s MAC address to the block list, and save.
TP-Link: Advanced > Wireless > Wireless MAC Filtering > Enable > Add blocked address ASUS: AiProtection > Device Blocking, or Wireless > Wireless MAC Filter NETGEAR: Advanced > Security > Access Control > Block device
One important caveat:
MAC blocking stops the specific MAC address from connecting — but a determined person with moderate technical skill can change their device’s MAC address (MAC spoofing) to bypass it. The real fix is changing your Wi-Fi password (see next section). Use MAC blocking as a temporary measure or as one layer in a broader security setup, not as your primary defense.
How to Kick Everyone Off and Start Fresh
Changing your Wi-Fi password is the nuclear option — and often the right one. It immediately disconnects every device on your network and forces every device to re-enter the new password before reconnecting. The unauthorized user, who doesn’t have the new password, stays out.
- Log into your router admin panel.
- Go to Wireless Settings or Wi-Fi Settings.
- Find the password field — labeled WPA Key, Network Security Key, or Pre-Shared Key depending on the brand.
- Set a new password. Make it at least 12 characters. A passphrase like “PurpleGarageMonday88” is both strong and rememberable. Avoid anything based on your address, name, or the router brand.
- Save and apply. Your router will briefly restart and all connected devices will be kicked off.
- Reconnect your own devices one by one using the new password.
Yes, it’s annoying to reconnect everything. Smart TVs, game consoles, smart speakers, streaming sticks — it takes about 20 minutes if you have a lot of devices. Do it anyway if you have a genuine unauthorized user.
While you’re in the router settings: also check that WPS (Wi-Fi Protected Setup) is disabled. WPS has known vulnerabilities — it was designed to make connecting easier, but the PIN-based method is broken by design and has been for years. CISA has flagged it. Turn it off under Wireless or Advanced Settings.
Preventing Unauthorized Access Going Forward
Checking who’s on your network once is useful. Checking regularly — and putting the right settings in place — means you probably won’t need to do emergency triage again.
Use WPA3 or WPA2-AES. WPA3 is the current standard and the right choice if your router and devices support it. WPA2-AES is solid. WPA (original) and WEP are broken — if your router is set to either, change it today.
Set a strong, unique Wi-Fi password. Not your address. Not “password123.” Not your ISP’s default. A 14-character passphrase you haven’t used anywhere else.
Keep router firmware updated. Routers with outdated firmware have known, exploitable vulnerabilities. Log into your admin panel every few months and check for updates — or enable auto-updates if your router supports it. See how to update router firmware for the full guide.
Use a guest network for visitors and IoT devices. Guests get internet access without getting access to your local network. Your smart plugs, cameras, and TVs get contained in their own subnet. Even if one gets compromised, the attacker can’t reach your personal devices. See how to set up a guest network.
Set up new device alerts if your router supports it. ASUS, NETGEAR Nighthawk, and some TP-Link routers can send push notifications whenever a new device connects. Turn this on and you’ll know immediately when something unfamiliar joins.
Run a scan monthly. It takes two minutes via the router admin panel or Fing. Make it a habit — the same way you check for software updates or review your bank statement. A monthly check catches unauthorized access early, before it becomes a problem.
FAQ
The fastest method is your router’s admin panel. Open a browser, type your router’s IP address (usually 192.168.1.1 or 192.168.0.1) into the address bar, log in with your admin credentials, and find the Connected Devices or DHCP Client List section. Every device currently on your network appears there with its name, IP address, and MAC address. The Fing app on iOS or Android gives you the same information in a friendlier interface with better device identification.
Not if your network is properly secured. A person on a different Wi-Fi network cannot see devices on yours — they’d need to be connected to the same network first. If someone has your Wi-Fi password and connects to your network, they can potentially discover other devices on it using the same methods in this article. A guest network prevents this by isolating devices from each other.
Almost certainly something you already own. Espressif Systems makes the microcontroller chips inside a huge percentage of smart home products — smart plugs, light bulbs, robot vacuums, and similar devices. When these devices don’t set a friendly hostname, they show up as “Espressif” or “ESP_XXXXXX” in your router’s device list. Use the power-off elimination method to figure out exactly which device it is: turn off your smart home devices one at a time and watch which entry disappears from the connected devices list.
More than you think. A typical US household in 2026 has 10–25 connected devices: phones, laptops, tablets, smart TV, streaming sticks, game console, smart speakers, smart plugs, thermostat, robot vacuum, printer, video doorbell, security cameras — and each phone might show a second entry due to MAC randomization. If your count looks high, don’t assume the worst before working through the identification steps.
Yes — through your router’s mobile app if you have one (TP-Link Tether, ASUS Router, Nighthawk, Google Home, Eero). These apps show connected devices natively without requiring a separate network scanner. If your router doesn’t have an app, open a mobile browser and navigate to your router’s admin panel by typing its IP address into the address bar — the process is the same as on a computer.
MAC randomization. Phones running iOS 14+ and Android 10+ use different randomized MAC addresses for different purposes. Your phone might appear once under its hostname and once as an unrecognized random MAC. You can verify it’s your phone by disabling MAC randomization for your home network in your phone’s Wi-Fi settings — on iPhone: Settings > Wi-Fi > tap your network > turn off Private Wi-Fi Address. The duplicate entry should resolve.
Yes — every device on the network, including your own, will be disconnected and need to re-enter the new password. This is actually the point when dealing with an unauthorized user. Set aside 15–20 minutes to reconnect your devices afterward, starting with the ones you use most. Streaming sticks and smart TVs often take the most time since their Wi-Fi settings menus can be buried.