You’re trying to log into your router — to change a password, check connected devices, update firmware, set up a guest network — and you need the IP address to get there. This is the address you type into a browser, and it’s sometimes called the default gateway. It’s not complicated to find, but where it lives differs by device and operating system.
This guide covers every method on every major platform: Windows 11, macOS, iPhone, Android, Chromebook, and Linux. It also includes a quick-reference table of default IP addresses by router brand for when you just need a fast answer, and a troubleshooting section for when the IP you found still won’t load in a browser.
What Is a Router’s IP Address?
Your router sits between your devices and the internet, directing traffic in both directions. To do that, it has an address on your local network — a number that looks something like 192.168.1.1. This is called the default gateway or the router’s local IP address. It’s how every device on your network knows where to send traffic that’s headed beyond the home network.
When you type this address into a web browser, you reach the router’s admin panel — the interface where you control Wi-Fi settings, connected devices, firmware updates, parental controls, port forwarding, and everything else your router manages. Think of it as the router’s own private website, accessible only from inside your home network.
Private IP vs. Public IP: Which One Do You Need?
Your router actually has two IP addresses, and they serve completely different purposes. This trips people up constantly.
Your router’s private IP (also called the local IP or default gateway) is the address on your home network — it’s 192.168.1.1 or similar. This is the one you need to access the admin panel. It only works from within your home network and is invisible to the outside world.
Your router’s public IP is the address your internet service provider assigns to your connection. This is what websites see when you browse the internet. It’s the same for every device in your home (they all share it), and it changes periodically unless you’ve paid your ISP for a static IP.
If you’re trying to log into your router’s settings, you want the private IP. If you’re trying to set up remote access, port forwarding, or a VPN, you’ll need the public IP at some point too — but that’s a separate task. To find your public IP, simply search “what is my IP address” in any browser.
Everything else in this guide refers to the private IP.
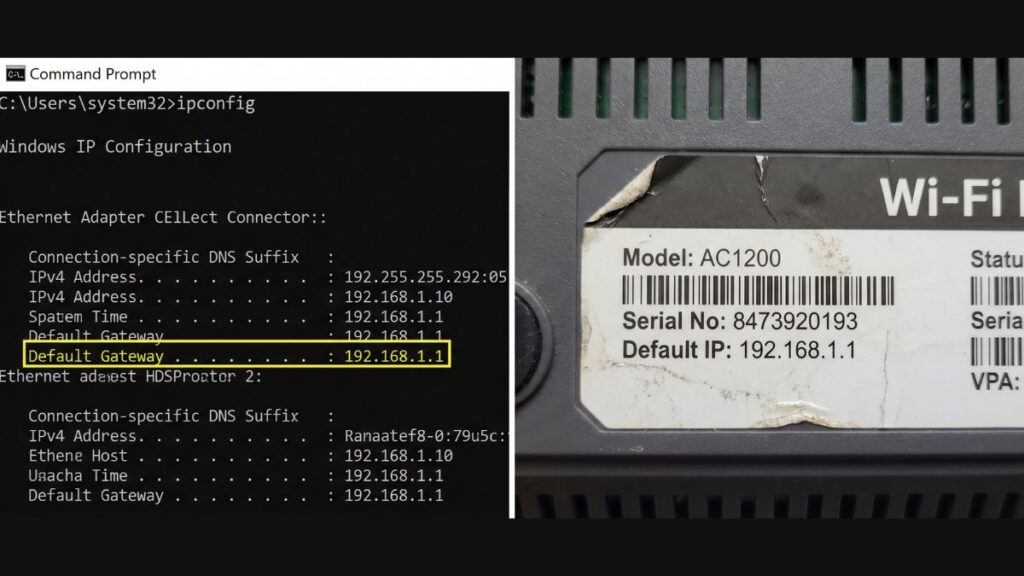
Fastest Method: Check the Router Sticker
Before doing anything else, flip your router over and check the sticker on the bottom or back panel.
Most manufacturers print the default IP address directly on the router label — often next to the default Wi-Fi name and password. It usually looks like one of these:
192.168.1.1192.168.0.1192.168.68.1(TP-Link Deco)10.0.0.1(Xfinity/Comcast gateways)
If the sticker shows an IP and no one has changed the router’s settings since it was first set up, that address will take you straight to the admin panel. Type it into your browser’s address bar (not the search bar) and press Enter.
If it doesn’t work, jump to the What If the Sticker IP Doesn’t Work? section. If there’s no IP listed on the sticker, use one of the device-specific methods below.
Default IP Addresses by Router Brand
If you know your router brand, try the default gateway listed here first. These are the factory defaults — if the IP was changed after setup, use a device-based method instead to find the current address.
| Router Brand | Default IP Address(es) |
|---|---|
| ASUS | 192.168.1.1 |
| NETGEAR | 192.168.1.1 or 192.168.0.1 |
| TP-Link (standard routers) | 192.168.0.1 or 192.168.1.1 |
| TP-Link Deco (mesh) | 192.168.68.1 |
| Linksys | 192.168.1.1 |
| D-Link | 192.168.0.1 |
| Eero (Amazon) | 192.168.4.1 (app-managed; no browser panel) |
| Google Nest Wi-Fi | App-managed; no browser admin panel |
| Xfinity / Comcast gateway | 10.0.0.1 |
| Spectrum / Charter | 192.168.1.1 |
| AT&T / BGW gateway | 192.168.1.254 |
| Verizon Fios (Actiontec) | 192.168.1.1 |
| Frontier | 192.168.254.254 |
| Huawei | 192.168.3.1 |
| Belkin | 192.168.2.1 |
| Motorola | 192.168.100.1 |
| Arris / Surfboard | 192.168.100.1 |
| Cisco (home) | 192.168.1.1 |
| Tenda | 192.168.0.1 |
| Ubiquiti UniFi | 192.168.1.1 |
| MikroTik | 192.168.88.1 |
Note: These are factory defaults. If you or your ISP changed the router’s IP during setup, the current address will be different. Use the OS-specific methods below to find the current active gateway address.
How to Find Your Router’s IP on Windows 11
Windows 11 gives you three ways to find the router’s IP. Pick whichever feels most natural.
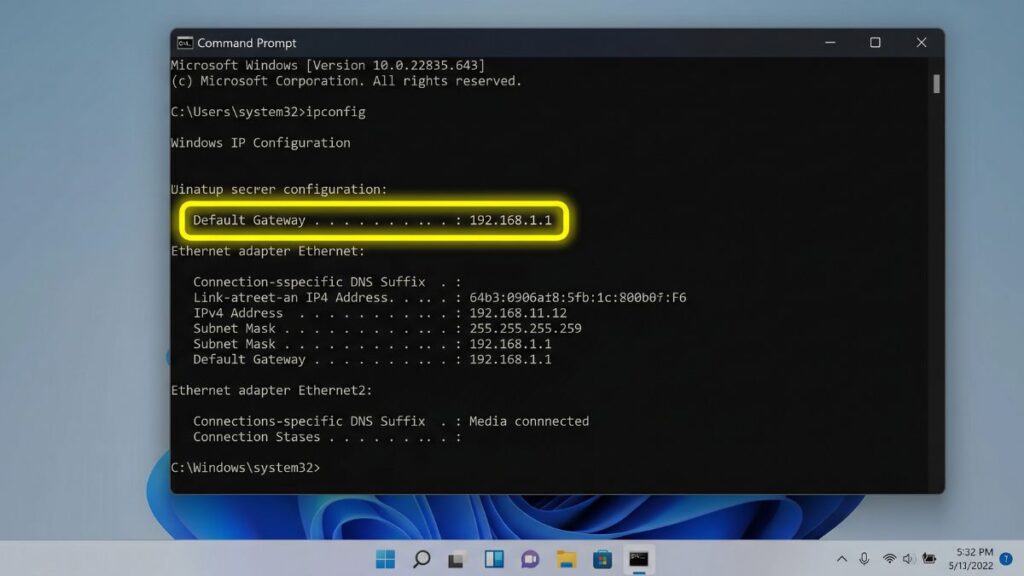
Method 1: Command Prompt (ipconfig) — Quickest
- Press the Windows key, type
cmd, and press Enter to open Command Prompt. - Type
ipconfigand press Enter. - Scroll through the output and find the section for your active network connection — it’ll say “Wireless LAN adapter Wi-Fi” (for Wi-Fi) or “Ethernet adapter” (for wired).
- Look for Default Gateway. The number next to it is your router’s IP address.
The output looks something like this:
Wireless LAN adapter Wi-Fi:
   IPv4 Address. . . . . : 192.168.1.105
   Subnet Mask . . . . . : 255.255.255.0
   Default Gateway . . . : 192.168.1.1
Your router’s IP is 192.168.1.1 in this example.
Method 2: Windows 11 Settings GUI (no command line)
- Click Start > Settings (gear icon).
- Click Network & internet in the left sidebar.
- Click your active connection — Wi-Fi or Ethernet.
- Click Hardware and connection properties.
- Scroll down and look for Default gateway. That’s your router’s IP.
Method 3: PowerShell
- Press the Windows key, type
powershell, and press Enter. - Type or paste:
(Get-NetIPConfiguration).IPv4DefaultGateway.NextHop - Press Enter. The router’s IP address displays directly — no scrolling through long output needed.
How to Find Your Router’s IP on Mac
Method 1: System Settings (macOS Ventura and later)
- Click the Apple menu () in the top-left corner.
- Select System Settings.
- Click Wi-Fi (or Network if using Ethernet).
- Click Details next to your connected network.
- Click the TCP/IP tab.
- Look for Router. The number next to it is your router’s IP address.
Method 2: System Preferences (macOS Monterey and earlier)
- Click the Apple menu > System Preferences > Network.
- Select your active network connection on the left (Wi-Fi or Ethernet).
- Click Advanced in the bottom right.
- Click the TCP/IP tab.
- Your router’s IP address is listed next to Router.
Method 3: Terminal
For those who prefer the command line, open Terminal from Applications > Utilities and run either of these commands:
netstat -nr | grep default
or
route -n get default | grep gateway
The router’s IP address appears next to “default” or “gateway” in the output.
How to Find Your Router’s IP on iPhone or iPad
- Open the Settings app.
- Tap Wi-Fi.
- Tap the ⓘ (information) icon next to the name of the network you’re connected to.
- Scroll down to the Router field.
- The number listed is your router’s IP address.
That’s it — no apps, no commands. The router IP is always visible here as long as your device is connected to the network.
How to Find Your Router’s IP on Android
Android varies more than any other platform because manufacturers customize the interface. Here are the two most common paths.
Standard Android / Stock UI
- Open Settings.
- Tap Network & internet (or Connections on Samsung devices).
- Tap Wi-Fi.
- Tap the name of your connected network (or tap the gear icon next to it).
- Tap Advanced or look for network details.
- Look for Gateway — that number is your router’s IP address.
Note: On some Android versions, the Gateway field only appears after you switch the IP settings from DHCP to Static (don’t worry — you can switch back immediately, or just read the number and tap Cancel). This is a display quirk, not a network change.
Samsung Galaxy (One UI)
- Open Settings > Connections > Wi-Fi.
- Tap the gear icon next to your connected network.
- Tap View more.
- The Gateway field shows your router’s IP address.
If your Android version doesn’t show a Gateway field anywhere in Wi-Fi settings, download the free Fing app, connect to your network, and it will display the router’s IP under the network summary.
How to Find Your Router’s IP on Chromebook
- Click the status area in the bottom-right corner of the screen (where the clock and Wi-Fi icon are).
- Click the gear icon (Settings).
- Click Network.
- Click your connected Wi-Fi network.
- Click Network tab in the panel that opens.
- Look for Gateway. That’s your router’s IP address.
Chromebook also works with the command line for those who have it enabled: open crosh (Ctrl+Alt+T), type shell, then run ip route | grep default. The router IP appears after “via”.
How to Find Your Router’s IP on Linux
The method depends slightly on your desktop environment, but the command line works universally.
Terminal method (works on all distributions)
Open a terminal and run:
ip route | grep default
The output looks like:
default via 192.168.1.1 dev wlan0 proto dhcp src 192.168.1.104 metric 600
The IP after “via” is your router’s address.
Alternatively:
nmcli -g IP4.GATEWAY device show wlan0
Replace wlan0 with your actual interface name (use ip link to see your interfaces).
GNOME desktop (Ubuntu, Fedora)
- Click the network icon in the top panel.
- Click the arrow next to your connected network.
- Click Wired Settings or Wi-Fi Settings.
- Click the gear icon next to your connection.
- Look for Default Route or Gateway under the Details tab.
What If You Have a Modem-Router Combo?
If your ISP provided a combination device — a single box that handles both the modem and router functions — you may have a slightly different situation. Many ISP gateways (Xfinity, AT&T, Spectrum) use non-standard default IP addresses like 10.0.0.1 or 192.168.1.254. The sticker on the device and the brand table above are your best references.
If you added your own router behind the ISP gateway, you now have two devices with their own IP addresses. The ISP gateway typically uses 10.0.0.1, and your personal router will have its own default IP (usually 192.168.1.1). The “Default Gateway” your devices report will be your personal router’s IP — use that to access your router’s admin panel.
What If the Sticker IP Doesn’t Work?
The sticker shows the factory default IP. If someone — you, a previous owner, or your ISP — changed the router’s IP address during setup, the sticker is outdated. The actual current IP could be anything.
The solution is simple: use one of the device-based methods above (ipconfig on Windows, System Settings on Mac, the Wi-Fi settings on iPhone) to find the active Default Gateway address. Your device always knows the correct current IP of the router it’s connected to, regardless of what the sticker says.
The other common reason the sticker IP doesn’t load is that you’re typing it in the wrong place — the search bar instead of the address bar. The address bar is at the very top of the browser window. If you type 192.168.1.1 into a Google search bar, you’ll get search results. Type it into the address bar and press Enter, and you’ll reach the router’s login page.
Mesh Systems: Google Nest and Eero Have No Browser IP
If you have a Google Nest Wi-Fi or Amazon Eero mesh system, there’s an important caveat: these systems do not have a traditional browser-based admin panel. You manage them entirely through their mobile apps — Google Home for Nest, and the Eero app for Amazon Eero.
Even though these devices have IP addresses on your network, typing that IP into a browser won’t give you an admin interface. There’s nothing to log into via browser. All settings, including network names, passwords, parental controls, and firmware updates, live in the app.
If you need the IP for troubleshooting purposes (for example, to verify network connectivity), you can still find it using the device methods above — it will show up as the Default Gateway. But to manage settings, open the app.
What to Do Once You Have the IP
Once you have your router’s IP address, here’s how to use it:
- Make sure your device is connected to the router’s network (Wi-Fi or Ethernet).
- Open any web browser.
- Type the IP address into the address bar at the top — not the search bar. For example:
192.168.1.1 - Press Enter.
- A login page will appear asking for a username and password.
- These credentials are on the router’s sticker. Common defaults are
admin/adminoradmin/password. If you’ve never changed them, the sticker is your answer.
From the admin panel, you can change your Wi-Fi name and password, set up a guest network, update your router’s firmware, configure port forwarding, view connected devices, set up parental controls, and change any other setting your router supports.
Troubleshooting: Why Won’t the IP Load in My Browser?
You’re typing it into the search bar, not the address bar This is the most common issue by a wide margin. The address bar is the bar at the very top of the browser — not the Google or Bing search box on the page. Make sure the IP is typed at the top.
Your device isn’t connected to the router’s network You can only reach the router’s admin panel from a device that’s on the router’s network. If your phone is on cellular data instead of Wi-Fi, the IP won’t load. Connect to Wi-Fi first.
The IP address was changed from the default Use the ipconfig / System Settings / Wi-Fi settings method (described above) to find the current active gateway IP rather than relying on the sticker. The sticker shows the factory default, which may have been changed.
Try a different browser Some browser extensions, security software, or DNS-over-HTTPS settings can prevent local IP addresses from loading. Try opening an incognito window or a different browser entirely.
The router needs a restart Occasionally a router stops serving its admin page if it’s been running for a very long time without a restart. Unplug it for 30 seconds, plug it back in, wait 2 minutes for it to fully boot, then try again.
You have a mesh system Google Nest and Amazon Eero don’t have browser admin panels. Use their mobile apps instead.
Wrong IP format Confirm you’re typing numbers with periods — not commas, dashes, or spaces. 192.168.1.1 is correct. 192,168,1,1 and 192.168 1.1 will not work.
FAQ
The two most common default router IP addresses are 192.168.1.1 and 192.168.0.1. ASUS, NETGEAR, Linksys, and Verizon Fios routers typically default to 192.168.1.1, while TP-Link and D-Link routers most commonly default to 192.168.0.1. Xfinity and Comcast gateways often use 10.0.0.1.
No — they’re completely different things. Your router’s IP address is how you reach the admin panel in a browser. Your Wi-Fi password is what devices use to connect to your wireless network. Once you’re in the admin panel, you can change the Wi-Fi password there.
The router’s local IP address is usually static — it stays the same unless you or your ISP manually changes it in the router’s settings, or the router is reset to factory defaults (which restores the default IP). Your public IP address, however, can change whenever your ISP reassigns it.
If you have multiple network adapters active (Wi-Fi and Ethernet simultaneously, or a VPN running), you may see multiple gateway entries. Use the one that corresponds to your active internet connection — typically the Wi-Fi or Ethernet adapter you’re actually using, not the VPN tunnel interface.
A router’s IP address is a logical address that can be changed and is used for network routing. A MAC address is a permanent hardware identifier printed into the router’s network card — it never changes. You use the IP address to reach the admin panel. The MAC address is used for network-level device identification and filtering.
Not via the local IP address — 192.168.1.1 and similar addresses are only reachable from within your home network. Someone outside cannot type your local IP and reach your router. Your public IP is a different story: if your router’s admin panel is exposed via remote management (a setting that’s off by default on most routers), someone could potentially access it via your public IP. This is why remote management should stay disabled unless you specifically need it.
The default credentials are on the sticker on your router. If they’ve been changed and you don’t know the new ones, you’ll need to factory reset the router, which restores the default credentials along with all other factory settings. To do this, hold the reset button on the back of the router for 10–30 seconds (check your model’s manual for the exact duration) until the lights indicate a reset.