Port forwarding is one of those networking topics that sounds more intimidating than it is. The name doesn’t help — “forwarding” implies complexity, and “port” sounds like something you need a networking degree to understand. You don’t. The concept is genuinely simple, and once you get it, the whole thing clicks.
Here’s the short version: your router blocks all uninvited incoming traffic by default. That’s mostly good — you don’t want random strangers on the internet knocking on your devices. But sometimes you want to accept an incoming connection. A friend connecting to your Minecraft server. Your security camera app pulling a live feed from outside your home network. A game that needs a direct peer connection to reduce lag. Port forwarding is how you tell your router: “When someone knocks on this specific door, send them to this specific device inside.”
This guide explains what port forwarding is, why your router blocks incoming traffic in the first place, how a forwarding rule actually works step by step, what TCP vs. UDP means, common ports you’ll actually need, how to set it up, the security considerations worth knowing, and what to do when it doesn’t work.
What Is a Port?
Before port forwarding makes sense, ports need to make sense.
Think of your public IP address as your home’s street address. Every house on the block has one. But inside your house, you have many different rooms — a kitchen, a living room, bedrooms, a home office. A port is like a room number. It tells network traffic which specific application or service on a device it’s meant for.
Your computer and router handle thousands of ports, numbered 0 through 65,535. Each port is a virtual channel that carries a specific type of traffic. Port 80 carries web traffic (HTTP). Port 443 carries encrypted web traffic (HTTPS). Port 22 is used for SSH remote access. Port 25565 is what Minecraft servers listen on.
When your browser loads a webpage, it doesn’t just connect to a server’s IP address — it connects to a specific IP address on port 80 or 443. The server knows to route that connection to the web service running on those ports, not to the database, not to the email service, not to anything else. Ports let a single device run dozens of services simultaneously without them interfering with each other.
Most ports are standardized — the same port number means the same thing on every server on the internet. This is intentional. It’s how your browser knows to speak HTTP when it connects to any web server in the world.
Why Your Router Blocks Incoming Connections by Default
Your router uses a technology called NAT — Network Address Translation. It’s the reason you can have fifteen devices in your house all sharing a single public IP address from your ISP.
Here’s how NAT handles outgoing traffic: when your laptop requests a webpage, the router notes which device made the request, swaps the private source IP with its public IP, and sends the request out. When the server responds, the router matches the response to its internal record and routes it back to your laptop. All of this happens in milliseconds, invisibly, for every connection you make.
NAT handles outgoing requests gracefully because it tracks them. It knows your laptop made a request to that server, so when the response arrives, there’s a record to match it to.
Incoming requests are different. When someone on the internet tries to connect to your public IP out of nowhere — with no prior outgoing request from your network — the router has no idea which internal device should receive it. There’s no record, no match. So it drops the traffic. The connection dies before it ever reaches your house.
That’s not a bug. That’s deliberate. The router is acting as a basic stateful firewall, and 99% of the time it’s exactly what you want. Uninvited traffic from the internet is almost never legitimate.
But sometimes it is. That’s what port forwarding handles.
What Port Forwarding Actually Does
Port forwarding adds a rule to your router that says: “When someone on the internet sends traffic to my public IP on port X, route it to device Y on my local network.”
The router stops dropping that specific traffic. Instead, it opens the door on that port and directs the connection to wherever you’ve pointed it.
Here’s a concrete example. You’re setting up a Minecraft server on a computer with the local IP address 192.168.1.100. Friends across the internet want to join. Without port forwarding, their connection hits your router’s public IP on port 25565 and gets dropped — the router has no idea what to do with it.
You add a port forwarding rule: external port 25565 → internal IP 192.168.1.100, port 25565, TCP/UDP. Now when a friend’s Minecraft client connects to your public IP on port 25565, the router intercepts it, checks its forwarding table, finds the rule, and routes the connection to your server computer. Your friend joins your world.
The router doesn’t actually “open” the port in any dramatic sense. It creates a routing rule. Traffic that matches the rule gets forwarded. Everything else continues to get dropped normally.
How Port Forwarding Works: Step by Step
Here’s what actually happens during a port-forwarded connection, from start to finish.
Step 1: The external device initiates a connection. A player’s Minecraft client sends a connection request to [your public IP]:25565. This packet travels across the internet and arrives at your router’s external (WAN) interface.
Step 2: The router receives the packet and checks its rules. Your router looks at the destination port — 25565 — and checks its NAT table. It finds a matching port forwarding rule you created.
Step 3: The router translates the destination. The router rewrites the destination of the packet, changing it from [your public IP]:25565 to 192.168.1.100:25565 (your Minecraft server’s local address). The source IP stays the same — it’s still the external player’s IP.
Step 4: The packet is delivered to the internal device. The router sends the rewritten packet to your Minecraft server at 192.168.1.100 on port 25565. Your server receives the connection and responds.
Step 5: The response travels back. Your Minecraft server sends a response back. The router translates this outgoing packet in reverse — it changes the source from your internal IP to your public IP — and sends it back to the player. The player’s client receives the response. The connection is established.
All of this happens in fractions of a second, continuously, for every packet in the game session. Once the rule is in place, the router handles everything automatically.
TCP vs. UDP: Which Protocol Do You Need?
When you set up a port forwarding rule, you have to choose a protocol: TCP, UDP, or both. This trips up a lot of people. Here’s what actually matters.
TCP (Transmission Control Protocol) is the reliable one. It confirms delivery — packets are sent, acknowledged, and retransmitted if they don’t arrive. This reliability makes it slower, but it’s perfect for anything where missing data is unacceptable: web browsing, file transfers, remote desktop sessions, SSH connections. If a packet gets lost, TCP automatically resends it.
UDP (User Datagram Protocol) is the fast one. It sends packets without any delivery confirmation. Some arrive, some don’t, and UDP doesn’t care. That sounds bad until you consider the use case: real-time applications like games, video streaming, and voice calls. In a first-person shooter, you’d rather receive slightly imperfect data in real time than wait for a retransmission. A packet that arrives half a second late is worse than one that’s slightly incomplete.
When you’re setting up port forwarding, check the documentation for the application you’re using. It’ll tell you which protocol it needs. Some applications use only TCP (like remote desktop). Some use only UDP (like some VoIP apps). Many use both — Minecraft Java Edition, for example, uses TCP 25565 for game data. When in doubt and the documentation doesn’t specify, select “Both (TCP/UDP)” and you’ll cover all bases.
Common Ports and What They’re Used For
You don’t need to memorize port numbers. But knowing the common ones saves a lot of searching when you’re trying to set up a service.
| Port | Protocol | Service | Typical Use Case |
|---|---|---|---|
| 21 | TCP | FTP | File transfer server |
| 22 | TCP | SSH | Secure remote terminal access |
| 25 | TCP | SMTP | Email sending (outgoing) |
| 80 | TCP | HTTP | Web server (unencrypted) |
| 443 | TCP | HTTPS | Web server (encrypted) |
| 3389 | TCP | RDP | Windows Remote Desktop |
| 5900 | TCP | VNC | Remote desktop (cross-platform) |
| 8080 | TCP | HTTP Alt | Alternative web server port |
| 25565 | TCP/UDP | Minecraft Java | Minecraft Java Edition server |
| 19132 | UDP | Minecraft Bedrock | Minecraft Bedrock Edition server |
| 27015 | TCP/UDP | Steam/CS2 | Steam game servers, Counter-Strike |
| 7777 | UDP | Terraria | Terraria multiplayer server |
| 32400 | TCP | Plex | Plex Media Server remote access |
| 8920 | TCP | Jellyfin | Jellyfin media server (HTTPS) |
| 51820 | UDP | WireGuard | WireGuard VPN |
One rule worth knowing: ports below 1024 are called “well-known ports” and are standardized by IANA. Ports 1024–49151 are registered ports. Ports 49152–65535 are dynamic/private ports often used by client applications for outgoing connections.
If a service runs on a well-known port (like a web server on port 80), you can use a different external port for added obscurity. For example, you could forward external port 8443 to your server’s internal port 443. The server still runs on 443, but attackers scanning for port 443 externally won’t find it. It’s security through obscurity — not a replacement for proper security, but a useful layer.
How to Set Up Port Forwarding on Your Router
The process is nearly identical across every major router brand. The menu labels differ; the steps don’t.
Before you start, you’ll need:
- Your router’s admin login page (usually at 192.168.1.1 or 192.168.0.1 — check the sticker on your router or see find your router IP address)
- Your admin username and password (on the sticker, or check default router passwords)
- A static internal IP for the device you’re forwarding to (more on this in the next section)
- The port number(s) and protocol required by your application
Step 1: Log into your router’s admin panel. Open a browser and type your router’s IP address into the address bar — not the search bar. You’ll reach a login page.
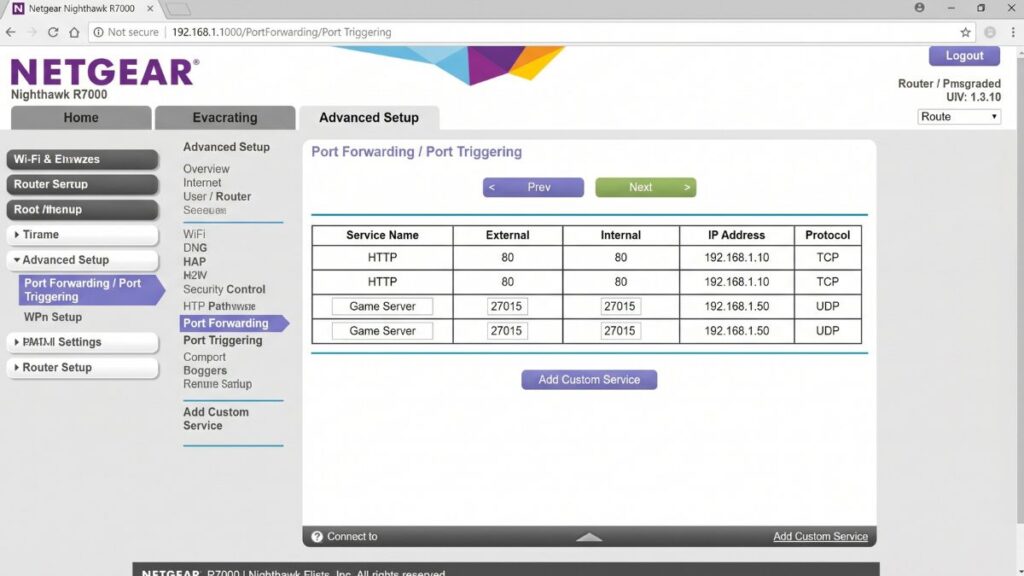
Step 2: Find the Port Forwarding section. Look under Advanced, NAT, Firewall, or Gaming. Different brands use different labels:
- TP-Link: Advanced > NAT Forwarding > Virtual Servers
- ASUS: WAN > Virtual Server / Port Forwarding
- NETGEAR: Advanced > Advanced Setup > Port Forwarding / Port Triggering
- Linksys: Security > Apps and Gaming > Port Range Forwarding
- D-Link: Advanced > Virtual Server
Step 3: Create a new forwarding rule. You’ll fill in several fields:
| Field | What to Enter |
|---|---|
| Name / Description | Something recognizable, e.g. “Minecraft Server” |
| External Port / WAN Port | The port number(s) external users will connect to |
| Internal IP Address | The local IP of the device running the service |
| Internal Port / LAN Port | Usually the same as the external port |
| Protocol | TCP, UDP, or Both |
| Status | Enable / On |
Step 4: Save and apply. Click Save or Apply. Some routers require a restart to apply forwarding rules — others take effect immediately.
Step 5: Test it. From a device outside your home network — a phone on cellular data, a computer at a friend’s house — try connecting to your service. If you’re testing without a real external device, use a free port checking tool (search “open port checker”) and enter your public IP and the port number. A “open” result means the forwarding is working.
Static IP: Why You Need One Before You Forward
This is the step most setup guides mention but don’t fully explain. And it’s the reason port forwarding “stops working” for so many people.
By default, your router assigns internal IP addresses dynamically via DHCP. That means your server computer might have IP 192.168.1.100 today, but after a restart, the router might assign it 192.168.1.104 instead. Your port forwarding rule still points to 192.168.1.100. The rule is valid — there’s just nothing at that address anymore.
You have two ways to fix this:
Option 1: DHCP Reservation (easiest) Most routers let you reserve a specific IP address for a specific device, identified by its MAC address. The router still uses DHCP, but it always gives that device the same address. Find this under DHCP Settings or LAN settings in your router’s admin panel. Look for “Address Reservation” or “DHCP Reservation.” You enter the device’s MAC address (usually found in the device’s network settings) and the IP you want to assign. Done — your device always gets that IP.
Option 2: Static IP on the device You can also configure the device itself to use a fixed IP address, bypassing DHCP entirely. On Windows: Settings > Network > your connection > IP settings > Manual. On Mac: System Settings > Wi-Fi/Network > Details > TCP/IP > Configure IP manually. Set an IP in your router’s range (e.g., 192.168.1.200) that’s outside the DHCP pool to avoid conflicts.
DHCP reservation is cleaner for most setups — you configure it once on the router and the device doesn’t need any changes. Go with that unless you have a specific reason to configure the device itself.
Port Forwarding vs. DMZ vs. UPnP: What’s the Difference?
These three are often mentioned together. They’re related but very different in practice.
Port Forwarding — what this entire guide is about. You manually create specific rules: this port goes to this device. Precise, controllable, reasonably secure if you only open what you need.
DMZ (Demilitarized Zone) — you designate a single device as the “DMZ host.” All traffic on all ports that isn’t explicitly handled by another rule gets routed to that device. It’s like opening every door in the building and pointing them all at one apartment. Useful for testing and for game consoles that need a lot of ports open, but it fully exposes that device to the internet. Only use it if you understand the security implications and the device has its own strong firewall.
UPnP (Universal Plug and Play) — applications on your network automatically request port forwarding rules from the router without any manual configuration on your part. Your game client starts up and tells the router “I need port 27015 open, please.” The router complies. Convenient — especially for consoles and media servers that otherwise require extensive manual configuration.
The problem with UPnP is trust. You’re delegating forwarding decisions to applications, and any malicious software on your network could exploit UPnP to open ports you didn’t intend. Most security-focused guides recommend disabling UPnP and configuring port forwarding manually for anything important. For gaming consoles where you’re less concerned about the risk, it’s a reasonable tradeoff for convenience.
Port Forwarding Security Risks (and How to Minimize Them)
Opening a port creates a pathway from the internet to a device on your network. That’s the point — but it also means that device is now reachable by anyone on the internet who knows your public IP and the port number.
A few things this means in practice:
The application on that port becomes your attack surface. If you forward port 3389 (Remote Desktop) to your Windows PC, every attacker on the internet who finds that open port can attempt to authenticate. If your Windows password is weak, you’re one brute-force attempt away from a breach. This is a very real risk. RDP exposed to the internet is one of the most commonly attacked entry points in network security incidents.
Keep the application updated. An open port to outdated software is especially dangerous — known vulnerabilities get catalogued and automated attacks probe for them constantly.
Use non-standard external ports when possible. Forward port 12345 (external) to 3389 (internal) on your Windows machine. Attackers scanning port 3389 won’t find it. This isn’t perfect security — a thorough port scan will find port 12345 — but it eliminates automated attacks targeting standard port numbers.
Close ports you’re not actively using. When you’re done hosting a game session, delete the forwarding rule or disable it. A closed port is always safer than an open one.
Never forward port 23 (Telnet). Telnet is unencrypted and ancient. If you need remote terminal access, use SSH (port 22) with a strong key, ideally on a non-standard external port.
Consider a VPN instead. For remote access to your home network, a VPN is almost always a better solution than port forwarding. Set up WireGuard (port 51820 UDP) on your router, connect your devices to your home VPN when you’re away, and access any resource on your network through the encrypted tunnel. One port, encrypted, authenticated. No exposed RDP, no exposed admin panels.
CGNAT: The Reason Port Forwarding Sometimes Doesn’t Work at All
Here’s something many guides bury or skip entirely — and it’s the number one reason port forwarding “works perfectly” on the router but still doesn’t work.
CGNAT stands for Carrier-Grade NAT. Some ISPs — especially mobile carriers like T-Mobile and certain cable/fiber providers — don’t give each customer a dedicated public IP address. Instead, they apply NAT at the ISP level, putting multiple customers behind a single shared public IP. You’re behind two layers of NAT: your router’s NAT and the ISP’s NAT.
When you set up port forwarding on your router, you’re configuring the inner NAT layer. But there’s still the outer ISP-level NAT sitting between your router and the internet. The ISP’s NAT doesn’t know about your forwarding rules. Incoming connections arrive at the ISP’s shared IP, and with no rule at that layer, they never reach your router at all.
How to tell if you’re behind CGNAT: Log into your router’s admin panel and look at the WAN IP address — the IP your router shows for its external interface. If it starts with 10.x.x.x, 100.64.x.x through 100.127.x.x, 172.16.x.x through 172.31.x.x, or 192.168.x.x, you’re behind CGNAT. Those are all private or shared IP ranges — your router doesn’t have a true public IP.
Compare that to what a “what is my IP” search shows in your browser. If the two addresses are different, you’re behind CGNAT.
What to do about it:
- Ask your ISP for a public IP. Many ISPs offer this as an upgrade — sometimes free, sometimes for a small monthly fee. It’s the cleanest solution.
- Use a VPN with port forwarding support. Services like AirVPN and some others include port forwarding at the VPN-provider level. Your forwarded port exists at their public IP, tunneled to your device.
- Use a tunnel service. Tools like Cloudflare Tunnel, ngrok, or frp set up a reverse tunnel from your home network to a server with a public IP. More complex to set up, but works behind CGNAT.
- Use IPv6 if your ISP supports it. IPv6 doesn’t use NAT by design — every device gets a globally routable address, and port forwarding isn’t necessary. Not all routers and ISPs handle this cleanly yet, but it’s the long-term solution to NAT entirely.
Troubleshooting Port Forwarding Problems
Port forwarding set up correctly but still not working? Here’s how to diagnose it.
The port shows as “closed” on an external port checker
Check in this order: Is the rule enabled in your router’s settings? Is the device actually running the application that listens on that port? Does the device’s own firewall (Windows Defender Firewall, UFW on Linux) allow inbound connections on that port? Is the internal IP in the forwarding rule correct and still assigned to the right device? Run through each step — it’s almost always one of these.
It worked for a while, then stopped
The internal IP changed. Your device got a new DHCP address and the forwarding rule is pointing at the wrong device now. Fix this with DHCP reservation as described above, or set a static IP on the device.
Port checker says “open” but the application still can’t connect
The port is reaching the device but the application isn’t accepting it. Check that the service is actually running. Check that it’s listening on the correct port. Try restarting the application.
Nothing works and my WAN IP looks like a private address
You’re behind CGNAT. Standard port forwarding won’t work. See the CGNAT section above.
I have two routers (modem/router combo + my own router)
This is called Double NAT. You need to forward the port on both routers — first on your personal router from its local network to itself, and then on the modem/router combo from the internet to your personal router’s IP. Alternatively, put the modem/router combo into bridge mode (sometimes called passthrough mode) so it stops performing NAT and lets your router handle everything. Contact your ISP if you need help enabling bridge mode on their device.
The port is open but only works sometimes
Dynamic public IP. Your public IP changed and whoever is connecting is using the old address. Fix this with a Dynamic DNS (DDNS) service — most router brands include a free DDNS option (ASUS DDNS, TP-Link DDNS, etc.). DDNS automatically updates a domain name (like yourname.tplinkdns.com) to point to your current public IP. Share that domain name instead of your raw IP address and connections will always find you.
FAQ
No — it doesn’t affect bandwidth or download speed at all. What it can improve is latency and connection reliability for specific applications. When a game or peer-to-peer application can establish a direct connection instead of routing through relay servers, the connection tends to be more stable and lower-latency. But the raw speed of your internet connection stays exactly the same.
Most routers use 192.168.1.1 or 192.168.0.1 for the admin panel — check the sticker on your router for the exact address and your admin credentials. TP-Link typically uses 192.168.0.1, while ASUS, NETGEAR, and Linksys generally use 192.168.1.1. D-Link uses 192.168.0.1 and AT&T gateways use 192.168.1.254.
It depends on what you’re opening and how you protect it. Forwarding a port to a well-maintained, up-to-date application that uses strong authentication (like a WireGuard VPN server) is reasonably safe. Forwarding RDP or SSH on their default ports to a device with a weak password is genuinely dangerous. Open only the ports you need, use strong passwords, keep applications patched, and close ports when you’re not using them.
Not directly — only one device can own a given external port at a time on a standard home router. If you need two devices to handle the same type of connection, you’ll need to use different external ports. For example: external port 25565 → Server 1, external port 25566 → Server 2. Clients connect to whichever port matches their server.
Some ports are especially risky to expose directly to the internet: port 23 (Telnet — unencrypted), port 3389 (RDP — extremely targeted by attackers), port 445 (SMB — used by Windows file sharing, frequently exploited), and port 25 (SMTP — ISPs often block this to prevent spam). If you must open any of these, use a non-standard external port and enforce strong authentication.
Port forwarding only applies to incoming connections — traffic initiated from outside your network that needs to reach a device inside. Outgoing connections (your devices requesting data from the internet) work fine without any port forwarding because NAT handles them automatically. You only need to configure port forwarding when you’re hosting something — a server, a camera feed, a remote desktop — that external devices need to initiate a connection to.
Some ISPs block specific ports on residential connections — particularly port 80 and 443 (to prevent home web hosting), port 25 (to prevent spam), and sometimes port 22 (SSH). If you confirm your forwarding rule is correct but the port still shows closed, contact your ISP to ask whether that port is blocked on your connection. The workaround is usually to forward a different, unblocked external port to the same internal port.