192.168.10.1 Not Working? How to Fix Your Router or Extender Login
Can't log into 192.168.10.1? Fix the login for your router or WiFi extender, learn default credentials across brands, and uncover the real reason extenders stop responding at this address after setup.
192.168.10.1 Device Access Panel
Type 192.168.10.1 into your browser or click below to launch the admin setup interface.
* Note: You must be connected to the device's direct Wi-Fi network or linked with an Ethernet cable.
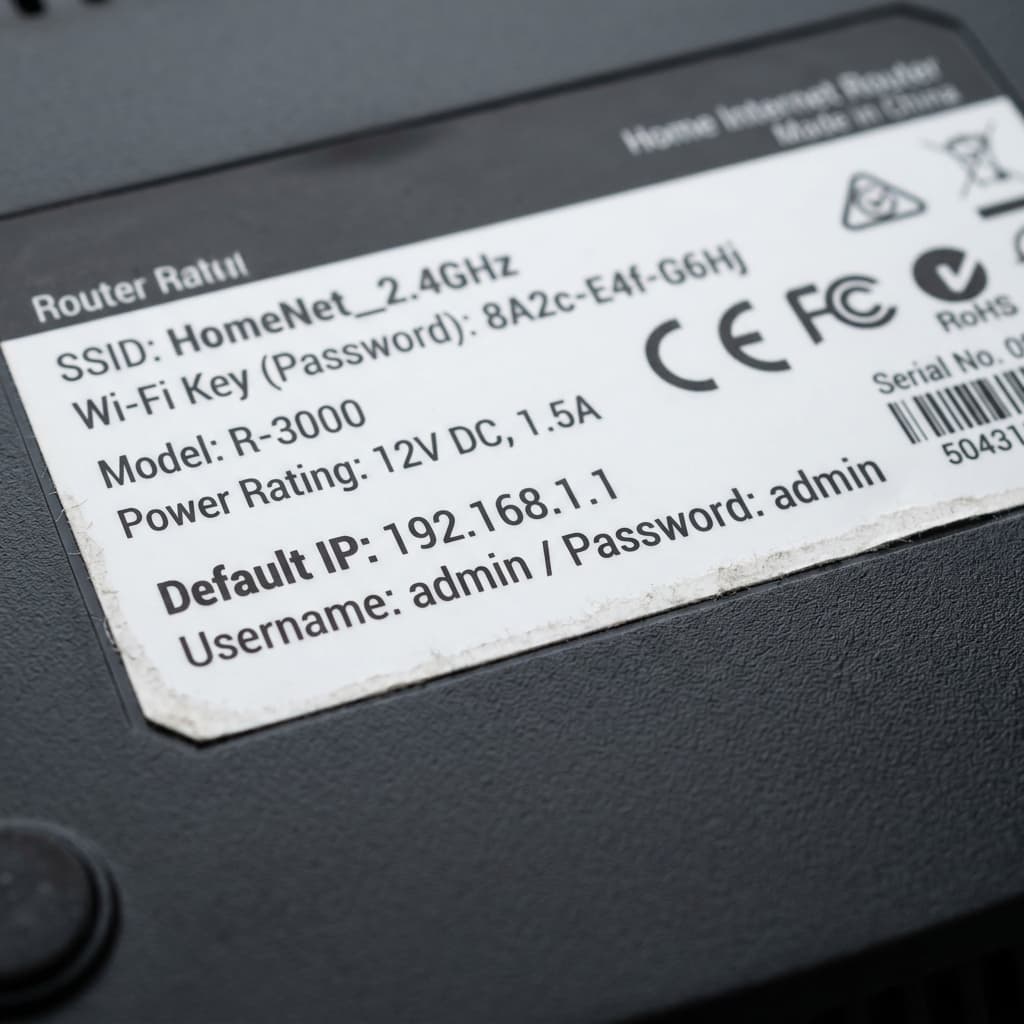
Check the physical label on your device for factory default IP (192.168.10.1), default SSID, and administrator login credentials.
You typed 192.168.10.1 into your browser expecting an admin login page, and instead got an error, a blank screen, or nothing at all. This address is a little different from more common ones like 192.168.1.1 or 192.168.0.1, because it's used by two distinct types of devices — and knowing which one you have changes what actually fixes the problem.
192.168.10.1 is the default IP address for a mix of standalone routers (D-Link, Motorola, Arris, ZyXEL) and, very commonly, WiFi extenders and repeaters (WAVLINK, Cudy, COMFAST). To log in, connect to the device's network and type http://192.168.10.1 into your browser's address bar with admin/admin as the default credentials. If you recently set up a WiFi extender and this address stopped working afterward, that's expected — covered in detail below, since extenders often change their own IP once configured.
First: Is This a Router or a WiFi Extender?
This distinction matters more for 192.168.10.1 than most other gateway addresses, because the fix is completely different depending on which hardware category you are troubleshooting.
| Symptom | Likely Situation | Action Step |
|---|---|---|
| Brand new device, never configured, address won't load | Standard connection/network issue | Connect directly to standalone default SSID or Ethernet cable (see steps below) |
| You set up a WiFi extender days or weeks ago and it worked initially | The extender changed its own IP after joining your main network (Normal) | Look up extender's new dynamic IP in your main router's DHCP client table |
| Device is a standalone router (D-Link, Motorola, Arris, ZyXEL) | Treat this like a standard router login | Follow the main login steps & brand credential database below |
| You're not sure what kind of device this even is | Unidentified hardware | Check the physical label sticker on the underside — it will state "Router", "Extender", or "Repeater" |
Why 192.168.10.1 Stops Working After Setting Up a WiFi Extender
This is the single most common reason people land on this page, and it is not a hardware malfunction.
Many WiFi extenders and repeaters — WAVLINK, Cudy, and COMFAST models in particular — ship with 192.168.10.1 as their out-of-box configuration address. This IP is used strictly during initial setup while the extender is broadcasting its own isolated, standalone network.
How a WiFi Extender Transitions IP Addresses During Setup
- Extender acts as its own DHCP server.
- Listens at 192.168.10.1.
- Assigns your phone/laptop a temporary IP like
192.168.10.100. - 192.168.10.1 is accessible.
- Extender joins main Wi-Fi network as a client bridge.
- Disables its internal 192.168.10.1 DHCP server.
- Receives a new dynamic IP from main router (e.g.
192.168.1.45or192.168.0.22). - 192.168.10.1 stops responding.
In other words: the address you used during setup often isn't the address the device uses after setup is complete. Trying to reach 192.168.10.1 again later fails not because anything broke, but because the device is no longer listening on that subnet.
How to Find the Extender's New IP Address:
Log into your main router's admin panel (typically at 192.168.1.1 or 192.168.0.1) and check the Connected Devices or DHCP Client List. The extender will appear there under its manufacturer name (e.g. WAVLINK, Cudy_RE, COMFAST) along with its active, reachable IP address. You can also run our IP Address Checker Tool to inspect your local subnet.
Step-by-Step Fix (For Initial Setup or Standalone Routers)
Confirm You're on the Right Network
If this is a new extender or router you are setting up for the first time, connect directly to its own Wi-Fi network (the default SSID printed on the label, like WAVLINK-N or Cudy-Extender) or link a laptop directly with an Ethernet cable — do not stay connected to your main home Wi-Fi network yet.
Type the Address Directly Into the Address Bar
Open any browser (Chrome, Edge, Safari, Firefox), click the top URL address bar (not a Google search box), and enter:
Adding the http:// prefix prevents browsers from redirecting your query to a search engine.
Enter Your Factory Login Credentials
When the login portal appears, submit the standard default username and password for your manufacturer:
| Brand | Username | Password |
|---|---|---|
| WAVLINK | admin | admin |
| D-Link | admin | (leave blank) |
| Motorola | admin | motorola |
| ZyXEL | admin | 1234 |
| Cudy | admin | admin |
| COMFAST | admin | admin |
* If these do not work, check the physical label on the device — some newer units ship with a unique printed password.
If You're Setting Up an Extender, Expect the Address to Change Later
This is essential to know before finishing setup: once your extender successfully connects to your main network, bookmark or note the device name so you can find its new IP later in your main router's connected devices list, rather than expecting 192.168.10.1 to remain reachable.
Try an Incognito Window or Clear Browser Cache
Old cookie sessions, browser extensions, or cached redirects from previous gateway logins can trigger ERR_CONNECTION_REFUSED or SSL protocol errors. Opening a private window isolates the local network request.
Turn Off Any Active VPN or Proxy
VPN tunnels route all outbound packets through encrypted remote servers. This prevents your browser from talking to local LAN addresses in the 192.168.10.0/24 subnet. Disconnect your VPN client before reloading.
Locked Out? Factory Reset Restores Standalone Setup Mode
If you customized the login credentials and forgot them, or if you need to reconfigure an extender that changed its IP, a hardware reset is the reliable solution:
- Locate the small recessed Reset pinhole button on the side or rear of the hardware.
- Using a paperclip or SIM ejector, press and hold the button for 8 to 10 seconds while the unit is plugged into power (WAVLINK models specifically require ~8 seconds).
- Release the button once the LED status indicators blink rapidly or cycle off.
- Allow 2–3 minutes for the device to reboot. Reconnect to its default Wi-Fi SSID and open
http://192.168.10.1to reconfigure.
Interactive 192.168.10.1 Admin Simulator
Test the login experience below. Enter admin / admin or test your hardware credentials:
Administrator Login
Access gateway configurations
What to Do Once You're Logged In
1. Change Default Admin Password
Never leave the default admin / admin credentials active. Anyone connected to your guest network can otherwise tamper with your DNS routing or firewall rules.
2. Complete Extender Wizard
For WiFi extenders, run the setup wizard to link to your primary 2.4GHz & 5GHz home Wi-Fi bands. Note the extender's new client IP from your main router dashboard afterward.
3. Secure Wi-Fi with WPA2/WPA3
For standalone routers, configure your SSID and enable WPA2-AES or WPA3-Personal encryption. You can also generate a quick QR code using our Wi-Fi QR Code Generator.
4. Update Device Firmware
Navigate to System Tools > Firmware Upgrade. Installing the latest vendor patch protects against known vulnerabilities like KRACK and remote code execution exploits.
Frequently Asked Questions
Why did 192.168.10.1 stop working after I set up my WiFi extender?
This is expected behavior, not a fault. Many extenders use 192.168.10.1 only during initial standalone setup, then switch to a new IP assigned by your main router's DHCP server once they join your network as a client bridge device.
What's the default password for 192.168.10.1?
admin / admin is the most common default across brands using this address (WAVLINK, D-Link, Cudy, COMFAST), though some newer devices use a unique password printed on the physical label sticker instead.
How do I find my extender's new IP address after setup?
Log into your main router's admin panel (such as 192.168.1.1 or 192.168.0.1) and check the connected-devices or DHCP client list — the extender will appear there under its device name with its current, active IP address.
Which brands use 192.168.10.1 as a default?
It is used by standalone routers (D-Link, Motorola, Arris, ZyXEL) and, very commonly, WiFi extenders, range boosters, and repeaters (WAVLINK, Cudy, COMFAST).
Can I still reach 192.168.10.1 after my extender finishes setup?
Usually not, since the device typically stops listening on that address once it joins your main network. A factory reset will temporarily restore access to 192.168.10.1 by returning the extender to standalone setup mode.
I'm locked out and don't know the password — what now?
A factory reset via the device's recessed reset button (held for 8–10 seconds) is the only reliable way back in. For an extender, this also resets it to standalone mode, making 192.168.10.1 responsive again until you reconfigure it.
The Bottom Line
192.168.10.1 behaves differently depending on whether you're dealing with a standalone router or a WiFi extender mid-setup. For routers, treat it like any standard admin login portal. For extenders, remember that this address is often a setup-only address — once configured, check your main router's DHCP client list instead of assuming this IP still works.