Your D-Link router admin panel is where everything gets configured — WiFi passwords, connected devices, parental controls, firmware updates, and security settings. Getting in takes about 30 seconds once you know the right address and credentials.
This guide covers login steps for Windows, Mac, iPhone, Android, and the mydlink app. You’ll also find a full credentials table for D-Link’s major model series, a troubleshooting section for the most common login problems, and a factory reset walkthrough.
D-Link’s Login Page — What It Is and How It Works
D-Link uses two ways to reach the admin panel: a hostname URL (dlinkrouter.local) and a numeric IP address (192.168.0.1).
The hostname option is more convenient — you don’t have to remember a number. But it relies on mDNS, which doesn’t work on every network setup. If dlinkrouter.local loads a blank page or gives a “server not found” error, switch to the IP address directly.
The admin panel only works when you’re on the same local network as the router. You can’t access it from a different building or over a VPN that routes your traffic elsewhere. That’s by design — it’s a security boundary, not a bug.
D-Link Default Login Credentials — All Major Models
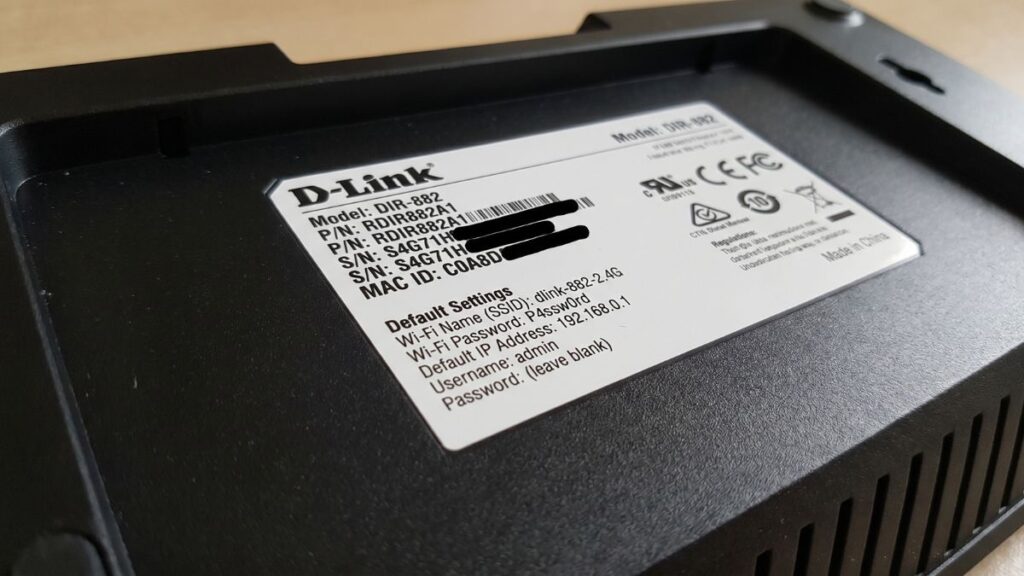
Most D-Link routers ship with the same defaults, but there are exceptions. Use the table below to find your model. If your model isn’t listed, check the sticker on the bottom or back of the router — it always shows the real credentials for that unit.
← Scroll to see full table →
| Model / Series | Default IP | Username | Password |
|---|---|---|---|
| DIR-615, DIR-625, DIR-628 | 192.168.0.1 |
admin | (blank) |
| DIR-655, DIR-825, DIR-835 | 192.168.0.1 |
admin | (blank) |
| DIR-842, DIR-853, DIR-867 | 192.168.0.1 |
admin | (blank) |
| DIR-882, DIR-895L AC5300 | 192.168.0.1 |
admin | (blank) |
| DIR-X1560, DIR-X1870 Wi-Fi 6 | 192.168.0.1 |
admin | (blank) |
| DIR-X3260, DIR-X5460 AX series | 192.168.0.1 |
admin | (blank) |
| DSL-2750B DSL modem-router | 192.168.1.1 |
admin | admin |
| DSL-2877AL | 192.168.1.1 |
admin | admin |
| DI-524, DI-634M | 192.168.0.1 |
admin | (blank) |
| DAP-1650, DAP-2553 Access points | 192.168.0.50 |
admin | (blank) |
| ISP-provisioned D-Link Some Frontier, CenturyLink | 192.168.0.1 |
admin | Printed on label |
Tip: The sticker on the back of your router shows the real credentials for that specific unit. The table above covers factory defaults only — if your ISP or a previous owner changed them, the sticker may not help and a factory reset will be necessary.
One thing most guides don’t mention: D-Link’s AX-series Wi-Fi 6 routers (DIR-X1560 and newer) will prompt you to create a new admin password on first login. If you’ve set one up before and forgotten it, there’s no default to fall back on — you’ll need a factory reset.
Logging In on iPhone
iPhone users hit a problem that PC guides never mention: iOS automatically switches to cellular data when your WiFi has no internet access. This happens during router setup or when the WAN cable isn’t connected yet. The device appears connected to your D-Link network but your browser is actually talking to the internet over 4G/5G — which is why 192.168.0.1 just times out.
Fix it first, then log in:
- Go to Settings → Mobile Data and turn it off temporarily.
- Make sure you’re connected to your D-Link WiFi network.
- Open Safari (not Chrome — Chrome on iOS sometimes auto-routes differently).
- Tap the address bar at the top and type
192.168.0.1— don’t use the Google search bar in Safari’s start page. - The D-Link login screen should appear. Enter admin as the username.
- Leave the password field blank. Tap Log In.
- After you’re done, go back and re-enable mobile data.
Safari tends to be more reliable than Chrome on iOS for router admin pages. Chrome occasionally caches a failed DNS lookup and serves a blank page even after you’ve fixed the connection.
Logging In on Android
Android has its own version of the same problem. When your D-Link network doesn’t have internet access (common during initial setup), Android marks the connection as “limited” and routes traffic over mobile data automatically. The router’s IP address becomes unreachable.
- Open Settings → Connections → WiFi and tap your D-Link network name.
- Look for a toggle that says “Switch to mobile data” or “Auto-switch” — turn it off.
- Still connected to your D-Link WiFi? Open Chrome.
- Tap the address bar and type
http://192.168.0.1— include thehttp://prefix. Some Android versions strip it otherwise. - The D-Link login page loads. Enter admin / blank password.
- Tap Log In and you’re in.
The auto-switch setting is buried and varies by Android version and manufacturer. On Samsung, it’s under WiFi → Advanced → Switch to mobile data. On stock Android, check Settings → Network & Internet → WiFi → (your network) → Use this network even without internet.
Logging In on PC or Mac
This is the most straightforward path — no carrier switching quirks to deal with.
Windows:
- Connect to your D-Link WiFi or plug in an Ethernet cable.
- Open Chrome, Firefox, or Edge.
- Click the address bar at the top — not the Google search bar in the middle of the page. They look similar but behave differently.
- Type
dlinkrouter.localand press Enter. If that fails, type192.168.0.1. - The D-Link login page appears. Enter admin and leave the password blank.
- Click Log In.
macOS:
Same steps, but Safari may show a “This connection is not private” warning before loading the login page. That’s normal — the router uses a self-signed certificate that no browser recognizes. Click Advanced → Proceed to 192.168.0.1 to continue. It’s not a security risk on your local network.
If dlinkrouter.local doesn’t resolve on macOS, try typing http://dlinkrouter.local with the full http:// prefix. Safari sometimes needs it.
Can’t find your D-Link’s IP? Open Terminal and type netstat -nr | grep default — the number next to default is your router’s gateway IP. On Windows, open Command Prompt and type ipconfig, then look for Default Gateway under your active connection.
Using the mydlink App
D-Link’s companion app is called mydlink. It’s available on the App Store and Google Play.
The app connects to your router remotely via D-Link’s cloud servers, which means it works from anywhere — not just when you’re home. That’s its main advantage over the browser admin panel.
What you can do in the app: view connected devices, get security notifications, run a speed test, check WAN status, and reboot the router remotely.
What you can’t do in the app: access advanced settings like port forwarding, DHCP reservation, static routing, or DNS configuration. For any of that, you still need the browser admin panel at dlinkrouter.local or 192.168.0.1.
Use the app for quick checks and remote reboots. Use the browser panel for actual configuration work.
First Login: What to Change Right Away
Once you’re in, don’t leave the default settings as-is. D-Link’s admin panel has a few areas worth hitting immediately.
1. Change the Admin Password
Go to Management → Admin Password (the exact label varies by firmware version — some show it as Tools → Admin). The admin password controls who can change your router settings. The default (blank) means anyone on your network can access the admin panel without authentication.
Pick something over 12 characters. D-Link’s admin panel won’t warn you if you choose something weak like “admin123” — it’ll just accept it. A password manager works well here since you’ll rarely need to type it.
For guidance on strong password construction, NIST password guidelines recommend length over complexity — a 16-character passphrase beats a short scrambled one every time.
2. Change Your WiFi Name and Password
Go to Setup → Wireless Settings (or Settings → Wireless on newer firmware). Change both the 2.4 GHz and 5 GHz SSIDs. Using the same name for both bands is fine — most devices handle band steering automatically.
The WiFi password you set here is separate from the admin password above. One controls who can join your network; the other controls who can change router settings. Mixing them up is the most common source of confusion.
3. Update the Firmware
D-Link doesn’t push firmware automatically on most consumer models. You have to check manually.
Go to Tools → Firmware Update (or Management → Upgrade). Click Check for New Firmware. If an update is available, let it install — it can take 3-5 minutes and the router will reboot. Don’t power it off during the process.
Keeping firmware current matters for security. D-Link has had several CVEs on older firmware versions, including authentication bypass issues on certain DIR-600 and DIR-615 hardware revisions. Newer firmware closes those.
4. Check Your Security Mode
Go to Setup → Wireless Settings and look at the Security Mode dropdown. If you’re on an older D-Link model (DIR-655 era), it may default to WPA/WPA2 Mixed. Upgrade to WPA2-AES only at minimum. If your router is an AX-series model (DIR-X1560 and newer), you’ll have the option to enable WPA3-Personal — worth turning on if all your devices support it.
The difference between WPA2 and WPA3 comes down to how the handshake is protected. WPA3 is harder to crack offline. Older devices (anything pre-2018) may not support WPA3, so test before committing.
Troubleshooting D-Link Login Problems
1. dlinkrouter.local Says “Server Not Found”
This is the most common D-Link-specific issue. The hostname relies on mDNS, which gets blocked by some browser extensions and VPNs. Fix: type 192.168.0.1 instead. If that loads the login page, the hostname DNS is the problem — not the router itself. No need to reset anything.
2. 192.168.0.1 Just Times Out
Usually means either you’re not connected to the right network, or your D-Link model uses a different IP. Check: open Command Prompt (Windows) or Terminal (Mac) and run ipconfig or netstat -nr | grep default. The Default Gateway listed is your router’s actual IP. You can also use the gateway IP lookup tool if you prefer not to use the terminal.
D-Link DSL modem-routers (DSL-2750B, DSL-2877AL) typically use 192.168.1.1, not 192.168.0.1.
3. Browser Shows “Connection Not Private” or Cert Warning
Expected behavior. D-Link’s admin panel uses HTTPS with a self-signed certificate that browsers flag as untrusted. It’s safe to proceed on your local network. Click Advanced and then Proceed or Continue to site. If you can’t find that option, try loading the page over HTTP instead: type http://192.168.0.1 explicitly.
4. Password Not Accepted
Three possibilities: you changed it at some point and forgot, someone else changed it, or it’s a DSL model that uses admin instead of blank as the default. Try both. If neither works, check the router label — some ISP-provisioned D-Link units ship with a unique password printed there. If all else fails, a factory reset is the only path forward.
5. VPN Is Blocking the Login Page
If you’re running a VPN on the device you’re using to log in, it may route all traffic through the VPN tunnel — including local network requests. This prevents the browser from reaching 192.168.0.1. Disconnect the VPN, log into the router, make your changes, then reconnect. Alternatively, check if your VPN client has a “split tunneling” option that excludes local traffic.
6. The Login Page Loads But You Can’t Log In After Reset
After a factory reset, some D-Link models take up to 90 seconds to fully boot. If you try to log in immediately after the reset light stabilizes, the admin panel may appear but reject your credentials because it hasn’t finished initializing. Wait a full 90 seconds after the power LED stops blinking, then try again.
Factory Reset: When and How
A factory reset wipes all your settings — WiFi name, passwords, port forwarding rules, everything — and restores the router to its original factory defaults. Do this only if you’ve forgotten the admin password and no other fix is working, or if you’re giving the router to someone else.
What you’ll lose: admin password, WiFi credentials, any custom DNS settings, DHCP reservations, port forwarding rules, and any parental controls. You’ll need to set all of this up again from scratch after the reset.
Before you reset: Log in if you still can and write down or screenshot your current settings. Some D-Link models also allow a config backup under Tools → System → Save Configuration — download that file so you can restore settings after the reset.
How to reset:
- Make sure the router is powered on and the power LED is solid (not blinking).
- Find the Reset button — it’s a small pinhole on the back or bottom of the router. You’ll need a straightened paperclip or a SIM eject tool.
- Press and hold the Reset button for 10 seconds. On D-Link DIR-series models, the power LED will flash rapidly and then the router will reboot.
- Wait for the router to fully restart — about 60-90 seconds.
- Connect to the new default WiFi network (printed on the label) and log in using default credentials.
Note: Older D-Link community guides sometimes recommend a “30-30-30” reset (hold for 30 seconds, unplug for 30, hold again for 30). D-Link’s own support documentation for current models doesn’t recommend this — a standard 10-second press is sufficient for all DIR-series routers from DIR-842 onward.