Quick answer: To change router DNS to Google DNS or Cloudflare DNS, sign in to your router admin panel, find the Internet, WAN, LAN, DHCP, or DNS section, disable automatic ISP DNS, and enter your preferred resolver addresses (Google: 8.8.8.8 and 8.8.4.4; Cloudflare: 1.1.1.1 and 1.0.0.1). Save the settings, allow the router to apply the change, and verify that devices resolve domain names properly using an nslookup test.
Technical review note: Router interfaces, menu names, and ISP restrictions vary by model and firmware. Confirm the DNS fields in your router's official manual before saving changes. Last reviewed in September 2026.
DNS stands for Domain Name System. It acts as the internet's phonebook, translating human-friendly domain names (such as routeripguide.com) into numerical IP addresses that computers, smartphones, and apps require to establish network connections. Setting custom DNS directly on your router automatically propagates your preferred resolvers to every phone, laptop, gaming console, and smart home appliance connected to your local network.
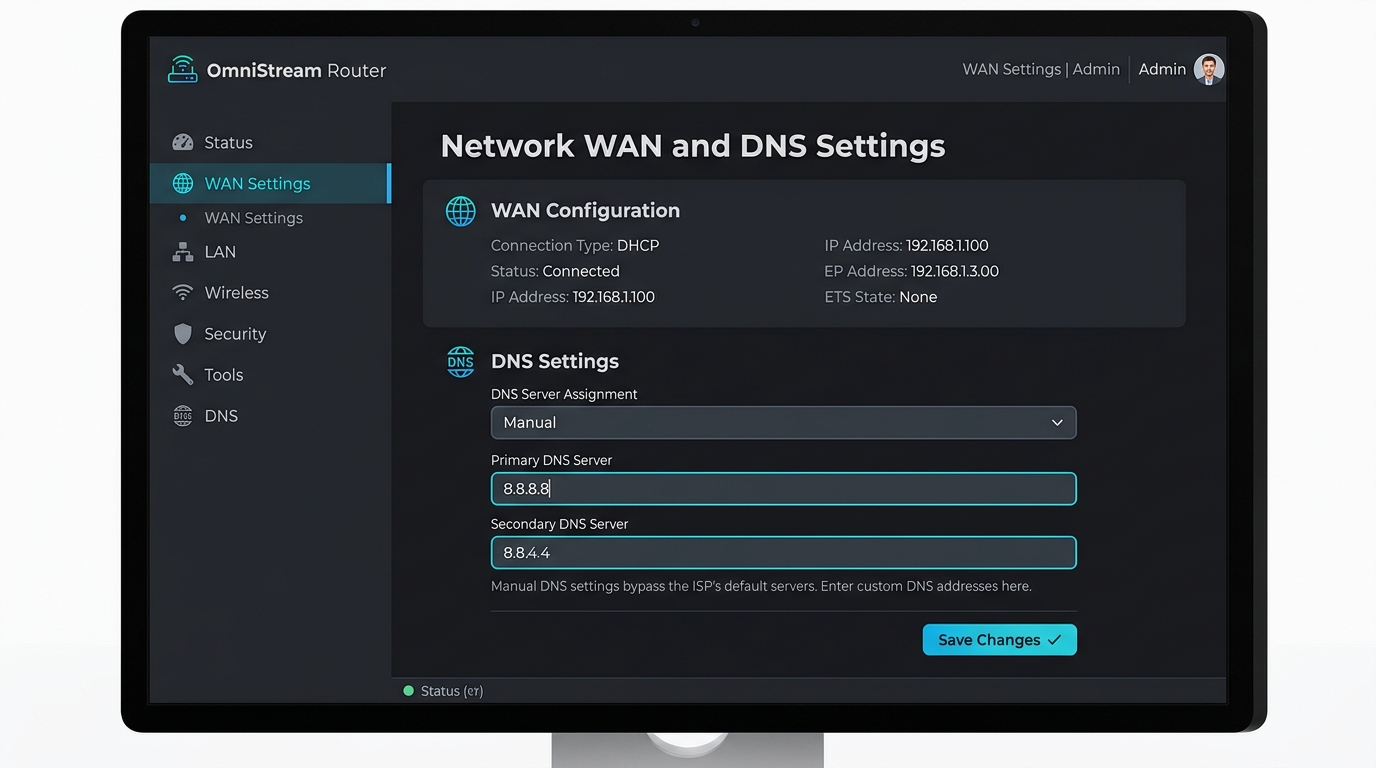
DNS Diagnostic: Common Symptoms & Quick Fixes
If web browsing halts or specific devices fail after updating your router's DNS settings, reference this diagnostic table to resolve the root cause:
| Observed Symptom | Probable Technical Cause | Immediate Recovery Target |
|---|---|---|
| Internet stops working immediately | Typo in IPv4 octets or IPv6 address pasted into an IPv4 DNS field | Verify exact digits (e.g. 8.8.8.8); ensure IPv6 addresses are only entered in IPv6 fields; revert to Automatic DNS if needed |
| Router rejects address or "Save" button disabled | Automatic DNS toggle remains active, or router requires secondary DNS field | Select "Manual DNS" or "Use Following DNS", fill both Primary and Secondary fields, and remove accidental leading/trailing spaces |
| Only some devices use new DNS | Client device is overriding router DNS with a VPN, Private DNS, or browser Secure DNS | Check device settings for active VPNs, Android Private DNS, Apple iCloud Private Relay, or browser DNS-over-HTTPS (DoH) |
| Smart TV or Wi-Fi printer drops offline | Device has cached old ISP DNS lease or uses hardcoded static IP configuration | Power-cycle the smart device to renew its DHCP lease; verify device does not require custom local gateway DNS |
| DNS settings hidden or locked in admin panel | ISP-provided gateway firmware locks WAN DNS to enforce ISP parental/tracking controls | Check LAN / DHCP Server settings instead of WAN; or connect an owned Wi-Fi router in Bridge mode |
DNS Server Addresses Reference Table
Choose one provider and use its matching primary and secondary addresses. Avoid mixing Google and Cloudflare addresses in the same configuration unless you have a specific routing reason and understand how to troubleshoot dual-provider latency:
| DNS Provider | Primary IPv4 | Secondary IPv4 | Primary IPv6 | Secondary IPv6 |
|---|---|---|---|---|
| Google Public DNS | 8.8.8.8 |
8.8.4.4 |
2001:4860:4860::8888 |
2001:4860:4860::8844 |
| Cloudflare 1.1.1.1 | 1.1.1.1 |
1.0.0.1 |
2606:4700:4700::1111 |
2606:4700:4700::1001 |
Important IPv6 Rule: Only enter IPv6 DNS addresses into dedicated IPv6 DNS configuration fields. If your router or broadband provider does not operate an active IPv6 connection, leave IPv6 disabled and configure IPv4 DNS exclusively.
Performance reality check: Changing DNS may improve domain lookup latency and bypass ISP DNS hijacking, but it cannot increase your ISP subscription speed or fix weak Wi-Fi signals, damaged cables, local congestion, or radio interference.
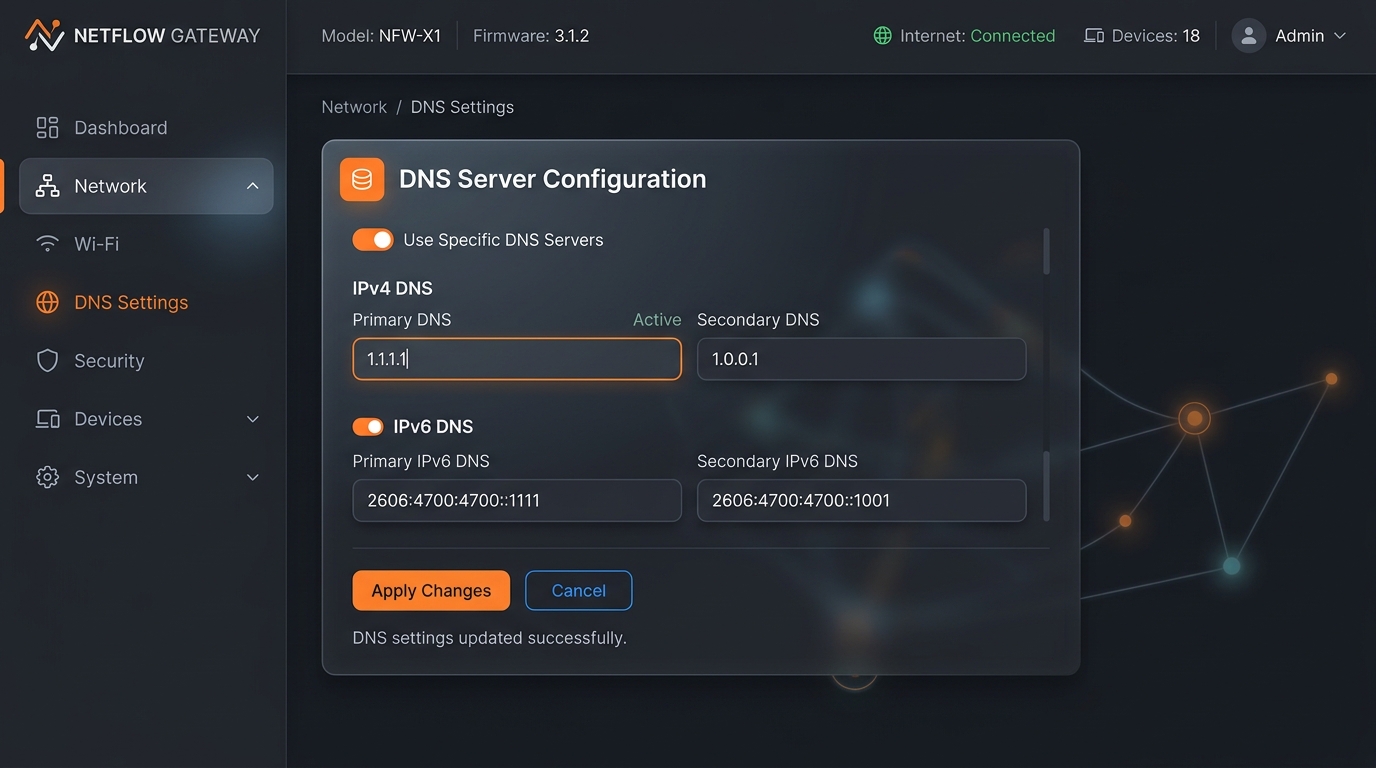
Before Changing Router DNS
1. Record Your Existing Settings
Before editing any values, take a screenshot or write down the current DNS numbers. Your router may currently run on:
- Automatic DNS dynamically supplied by your ISP.
- ISP-specific static DNS servers.
- Custom DNS configured during an earlier setup.
- DNS filtering provided by a security or parental control suite.
If your router supports Backup & Restore or Export Configuration, generate a backup first. This protects your DHCP reservations, port forwards, and custom Wi-Fi setup.
2. Know Where DNS Settings Appear (WAN vs. LAN/DHCP)
Routers typically expose DNS settings in one of two architectural layers:
- WAN / Internet Setup: Dictates the upstream DNS servers that the router itself queries when resolving external hostnames.
- LAN / DHCP Server Setup: Instructs the router's internal DHCP server which DNS IP addresses to hand out to connected client devices during IP lease negotiations.
If your router allows both, configuring WAN DNS updates the router's recursive lookup engine, while configuring DHCP DNS instructs clients to query Google or Cloudflare directly.
3. Find the Router Login Gateway
To access your router's administration interface, enter its private IP address in a web browser. Common default gateways include 192.168.1.1, 192.168.0.1, and 10.0.0.1. If you need step-by-step assistance locating your gateway address, see our comprehensive guide on how to find your router's IP address or use our automated Default Gateway Lookup Tool.
Change Router DNS Step by Step
Step 1: Sign In to the Router Admin Panel
- Connect a computer, tablet, or phone to your router via Wi-Fi or an Ethernet cable.
- Open a web browser and type your router's gateway IP into the URL address bar.
- Sign in using your router administrator username and password (distinct from your Wi-Fi password).
Step 2: Open DNS Settings
- Locate the Internet, WAN, Network, or Advanced setup menu.
- Open the active internet connection profile.
- Look for DNS Server, Primary DNS, or Obtain DNS Automatically.
- Toggle the setting from Automatic to Manual DNS or Use the Following DNS Servers.
Step 3: Enter Google DNS Addresses
If using Google Public DNS, input the following in the IPv4 DNS fields:
- Primary DNS:
8.8.8.8 - Secondary DNS:
8.8.4.4
If your router has active IPv6 DNS fields, enter:
- Primary IPv6 DNS:
2001:4860:4860::8888 - Secondary IPv6 DNS:
2001:4860:4860::8844
Step 4: Enter Cloudflare DNS Addresses
If using Cloudflare 1.1.1.1, input the following in the IPv4 DNS fields:
- Primary DNS:
1.1.1.1 - Secondary DNS:
1.0.0.1
For IPv6-enabled fields, enter:
- Primary IPv6 DNS:
2606:4700:4700::1111 - Secondary IPv6 DNS:
2606:4700:4700::1001
Step 5: Save Settings and Reconnect Devices
- Click Save, Apply, or Submit.
- Wait 30–60 seconds while the router applies the new configuration.
- Reboot the router only if the administration interface explicitly prompts you to do so.
- Disconnect and reconnect your client devices to Wi-Fi to force them to renew their DHCP leases and inherit the new DNS resolvers.
Google DNS vs. Cloudflare DNS Comparison
| Consideration | Google Public DNS | Cloudflare 1.1.1.1 |
|---|---|---|
| IPv4 Resolvers | 8.8.8.8 & 8.8.4.4 |
1.1.1.1 & 1.0.0.1 |
| IPv6 Resolvers | 2001:4860:4860::8888 & ::8844 |
2606:4700:4700::1111 & ::1001 |
| Primary Strength | Massive global infrastructure, robust anycast routing, Google cache proximity | Ultra-low latency, strict privacy policy, 24-hour log purges |
| Can Bypass ISP Bandwidth Throttling? | No | No |
| EDNS Client Subnet Support | Yes (sends anonymized client subnet for geo-optimized CDN routing) | No (omits client IP for enhanced anonymity) |
Common Router Menu Locations
| Router Brand / Model | Typical Menu Navigation Path |
|---|---|
| TP-Link | Advanced > Network > Internet > Advanced > Use the Following DNS Addresses (see our TP-Link setup guide) |
| Netgear | Advanced > Setup > Internet Setup > Domain Name Server (DNS) Address |
| Asus (ASUSWRT) | Advanced Settings > WAN > Internet Connection > WAN DNS Setting |
| D-Link | Settings > Internet > IPv4 > Primary DNS Server |
| Linksys | Configuration > Connectivity > Internet Settings > Edit DNS |
| Tenda | Internet Settings > DNS Mode > Manual |
| JioFiber / Airtel Gateways | Network > WAN or LAN Settings > DHCP Server (often locked on newer firmware) |
Verify the DNS Change
Simply loading a webpage is not definitive proof that your new DNS is active, as your browser or OS may be reading from local disk cache. Run a command-line DNS lookup test for verification.
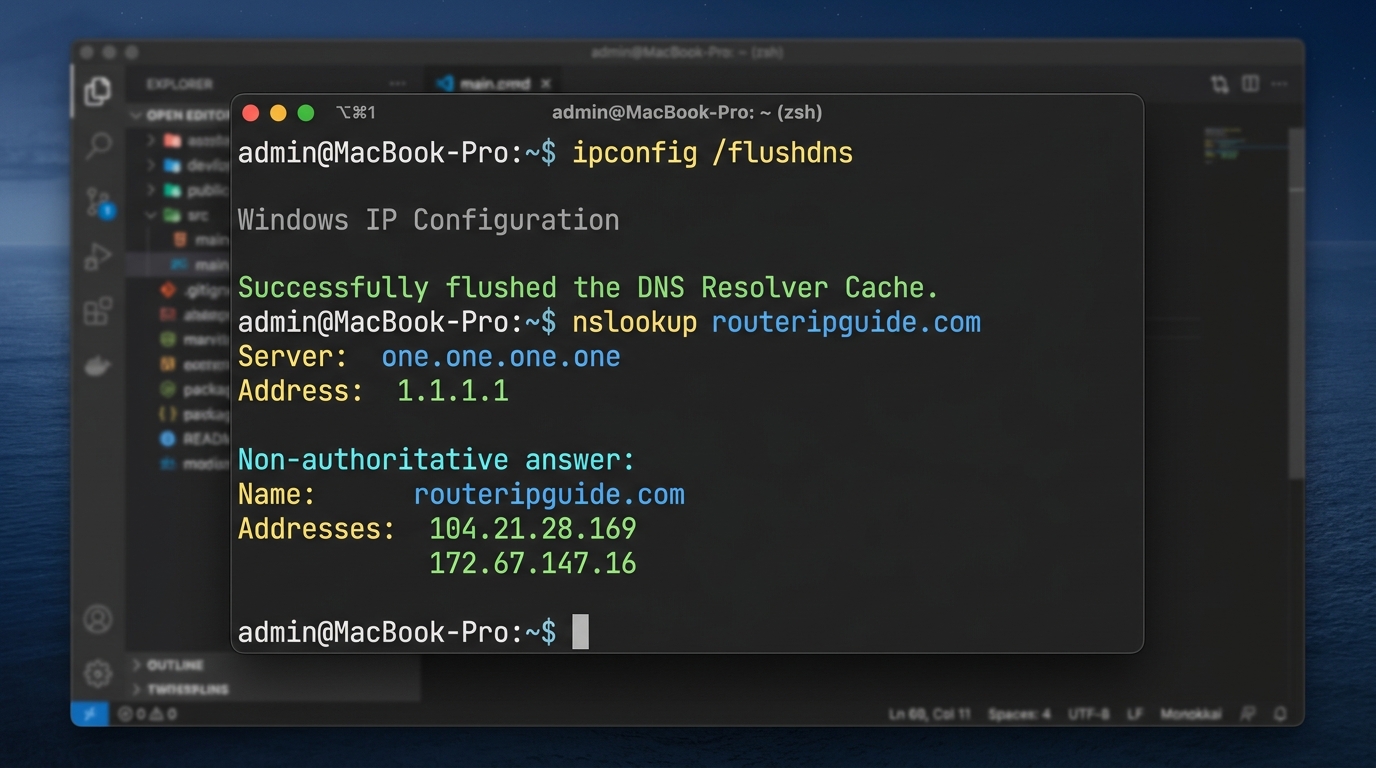
Test on Windows
- Press Win + R, type
cmd, and press Enter. - Flush the local DNS cache by typing:
ipconfig /flushdnsand press Enter. - Query your active resolver by typing:
nslookup routeripguide.comand press Enter. - Verify that the Server line displays your router IP,
dns.google, orone.one.one.one, and returns a valid IP address.
Test on macOS & Linux
- Open Terminal.
- Type:
nslookup routeripguide.comand press Enter. - Confirm that the server address listed matches your new configuration.
Test on Android & iOS
- Toggle Wi-Fi OFF and ON to force DHCP renewal.
- Open multiple websites in an Incognito / Private browsing tab.
- Ensure your device is not running a VPN, Private DNS (Android), or iCloud Private Relay (iOS) that bypasses router DNS.
Troubleshoot DNS Problems
1. Internet Stops Working Entirely
- Log back into your router management dashboard via Ethernet.
- Check for typing errors in your DNS IP fields (e.g. typing
8.8.8.or1.1.1). - Confirm you did not accidentally enter an IPv6 string into an IPv4 DNS field.
- Toggle DNS back to Obtain Automatically from ISP, click Apply, and confirm that connectivity recovers.
2. Router Refuses to Accept the Address
- Ensure you are editing the active connection profile (WAN or DHCP).
- Confirm that "Automatic DNS" or "Get from ISP" is toggled OFF.
- Verify no hidden whitespace was pasted before or after the numbers.
3. Only Specific Devices Resolve Hostnames
- Check if the problematic device has a local VPN client running.
- Inspect Android Settings under Network > Private DNS (turn OFF if you want router DNS).
- Inspect iOS Settings under Wi-Fi > Configure DNS (set to Automatic).
- Check browser settings for Secure DNS (DNS-over-HTTPS) which overrides system DNS.
4. Smart Home Hardware Disconnects
- Reboot smart speakers, IP security cameras, or wireless printers.
- Verify whether the smart device has a hardcoded static IP configuration that specifies an obsolete gateway.
Protect Your DNS Settings (Security Hardening)
DNS is a primary attack vector. If a malicious actor gains access to your router, they can alter DNS servers to silently redirect your banking and email traffic to counterfeit phishing websites (DNS hijacking). Protect your settings with these baseline security measures:
- Enforce a Strong Admin Password: Never keep the factory default router administrator password.
- Keep Router Firmware Updated: Regularly install vendor patches to safeguard against DNS cache poisoning vulnerabilities (consult our safe router firmware update guide).
- Disable Remote Management: Block administration of your router over public WAN internet connections.
- Disable WPS (Wi-Fi Protected Setup): Eliminate brute-force pin vulnerabilities.
- Export a Fresh Backup: Save a new configuration backup file once your custom DNS settings are confirmed stable.
Frequently Asked Questions
What is the best DNS for my router?
There is no single universal "best" DNS resolver. Google Public DNS (8.8.8.8) and Cloudflare (1.1.1.1) are industry leaders with global anycast routing. Cloudflare typically offers slightly lower query latency and strict privacy, while Google offers extensive global peering. Test both in your geographical region to determine which delivers the most reliable performance.
Can changing router DNS make the internet faster?
It can reduce the lookup latency required to resolve website names, making webpages begin loading faster if your ISP's DNS is slow or overloaded. However, DNS cannot increase your broadband bandwidth, raise download speeds, or fix weak Wi-Fi coverage.
Should I use Google DNS or Cloudflare DNS?
Both are free, secure, and reputable. Choose Cloudflare (1.1.1.1 and 1.0.0.1) if your priority is query privacy and speed, or Google Public DNS (8.8.8.8 and 8.8.4.4) for high resilience and deep global infrastructure. Stick to matching pairs from one provider rather than mixing them.
Does router DNS affect every device?
Yes, for all devices that obtain network settings automatically via DHCP. However, devices with manual IP configurations, active VPN tunnels, Android Private DNS, Apple iCloud Private Relay, or browser-based Secure DNS will bypass the router's DNS settings.
Can an ISP prevent custom DNS settings?
Some ISP-supplied modem/router combos lock or hide WAN DNS settings in their firmware. You can often bypass this by setting custom DNS in the router's LAN/DHCP settings, or by bridging the ISP unit to a customer-owned wireless router.
Why are there primary and secondary DNS fields?
The secondary DNS server acts as an automatic failover. If the primary resolver experiences maintenance, packet loss, or downtime, your router immediately routes DNS requests to the secondary resolver without dropping your internet connection.
How do I undo a DNS change?
Log in to your router dashboard, return to the DNS section, and toggle the setting back to "Obtain DNS Automatically from ISP" (or re-enter your ISP's original numbers). Save the configuration and reconnect your devices.
Is it safe to change DNS on a router?
Yes, changing to verified public resolvers like Google or Cloudflare is completely safe and often improves privacy and security compared to default ISP servers. Avoid using unknown DNS IPs advertised on random websites or pop-ups, as rogue DNS can direct you to malicious sites.
Bottom Line
Configuring Google DNS (8.8.8.8 / 8.8.4.4) or Cloudflare DNS (1.1.1.1 / 1.0.0.1) on your router provides centralized, reliable domain resolution for your entire household. Always record your prior configuration before editing, match your primary and secondary resolver pairs, and confirm active resolution with an nslookup test. If connection issues arise, verify IP octets for typos or revert to automatic ISP DNS.