You typed 192.168.0.1 into your browser, hit Enter, and got nothing. Or maybe you got a “site can’t be reached” error. Either way, you’re trying to log into your eero router and you’re stuck.
Here’s what’s going on: eero router login doesn’t work through a browser. There’s no admin page at any IP address. Amazon built eero around a smartphone app — and that app is the only way to get into your network settings.
This guide covers everything you need. How to log in on iPhone, how to log in on Android, what to do if the app won’t let you in, how to reset your eero if you’re completely locked out, and what you can actually control once you’re inside the app. By the end, you’ll have full access to your network settings.
Why Eero Login Works Differently From Other Routers
Most home routers run a small web server inside the device itself. You type an IP address like 192.168.0.1 into your browser, and that web server serves up a login page. Simple.
Eero doesn’t do that. Amazon built eero around cloud-based management, which means your router’s settings live on eero’s servers — not on the device sitting in your living room. The router doesn’t host a local web interface, so there’s nothing for your browser to connect to.
That’s a deliberate design choice. It makes setup easier for most people, and it means eero can push firmware updates and security patches automatically without you doing anything. The tradeoff is that you can’t manage your network from a browser.
What eero Uses Instead
The eero app is your admin panel. It runs on iOS and Android, connects to eero’s cloud, and gives you control over everything — WiFi name, password, connected devices, parental controls, port forwarding, and more.
Download it, log in, and you’re in. That’s the whole process.
How to Log Into Your Eero Router — Step by Step
Step 1: Download the eero App
Get the app from the right store for your device:
- iPhone or iPad → Apple App Store → search “eero Home WiFi System”
- Android phone or tablet → Google Play Store → search “eero”
- Amazon Fire tablet → Amazon Appstore → search “eero”
The app is free. You need it installed before you can do anything else.
Step 2: Sign In to Your Account
Open the app. You’ll see two login options:
- Sign in with Amazon — the easiest option if you bought your eero from Amazon. Tap the button and log in with your regular Amazon email and password.
- Sign in with an eero account — enter your email address or phone number. Eero sends a one-time verification code via SMS or email. Enter that code to get in.
Eero uses passwordless login for eero accounts by default. You don’t have a stored password — just your email or phone, plus a code sent each time. This is intentional. It’s harder for someone to break into your account without access to your phone or inbox.
Step 3: Navigate Your Network Settings
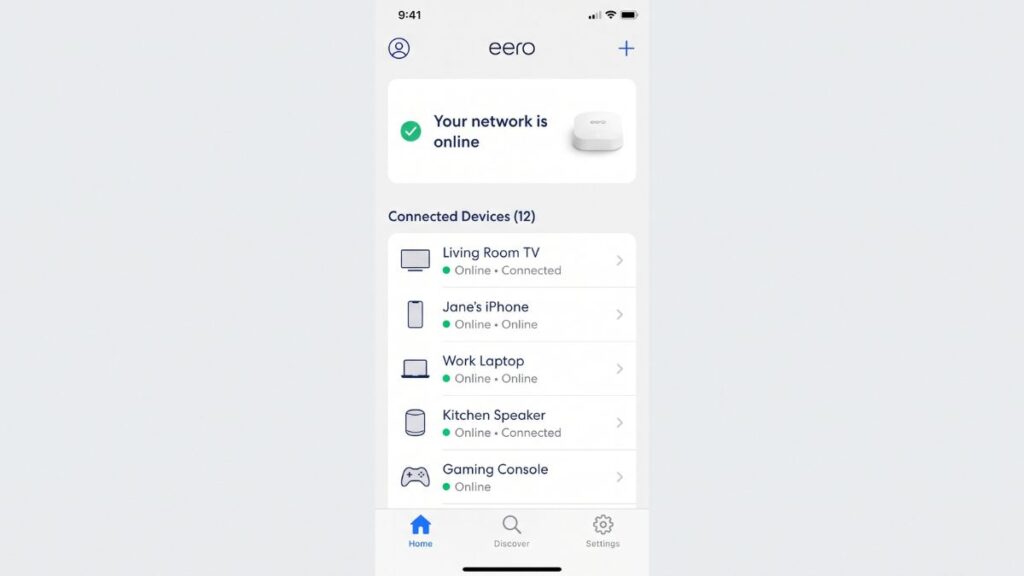
Once you’re logged in, you’ll land on your network’s home screen. From here:
- Tap Settings (bottom-right corner) to access all configuration options
- Go to Network Settings to change your WiFi name or password
- Tap Devices to see everything connected to your network
- Tap Profile (top-right) to manage your eero account
That’s your router admin panel. It doesn’t look like what you’d get from a traditional router, but it gives you the same control — just through a cleaner interface.
Eero Router Login on iPhone (iOS)
- Open the eero app
- Tap Sign in with Amazon or enter your email address or phone number
- If using an eero account, enter the verification code sent to your phone or inbox
- From the home screen, tap Settings in the bottom-right corner
- Tap Network Settings
- Tap WiFi Name & Password to view or change your network credentials
- Make your changes and tap Save
If you’re logging in for the first time after buying an eero, the app will walk you through the full setup process instead. You’ll connect the eero to your modem, name your network, and set a password — all guided, step by step.
Eero Router Login on Android
The Android steps are nearly identical to iOS:
- Open the eero app
- Tap Sign in with Amazon or enter your email or phone number
- Enter the verification code when prompted
- Tap Settings from the bottom navigation bar
- Go to Network Settings → WiFi Name & Password
- Update your SSID or password and tap Save
One thing to watch: during first-time setup, your Android phone needs a mobile data connection — not just WiFi. The eero app has to reach eero’s cloud servers to authenticate, and it can’t do that if you’re relying on a WiFi connection that doesn’t have internet yet. Turn mobile data on before you start.
Can You Access Eero From a PC or Browser?
Sort of — but not for anything useful.
account.eero.com is the only browser-based option. You can log in there with your Amazon or eero account and see basic account info: subscription status, billing, and account settings. But you can’t change your WiFi password, see connected devices, or touch any actual network settings from that page. It’s account management, not router management.
Some people run the eero Android app inside an emulator like BlueStacks on Windows or Mac. That works, technically. But it’s not an official solution, it adds complexity, and you’re running your router credentials through a third-party app. Not something most home users need to bother with.
For pretty much everyone, the phone app is the right answer. It’s faster than any workaround.
Eero Default IP, Credentials & Model Comparison
Eero doesn’t use a traditional username and password system. But the router does have a default gateway IP — most eero models use 192.168.0.1. You can use our gateway IP finder tool to confirm yours if you’re unsure.
Typing that IP into a browser won’t open an admin panel. But it’s useful for network diagnostics, pinging the router, or checking whether your device is connected to the right network.
← Scroll to see full table →
| Setting | Value |
|---|---|
| Default Gateway IP | 192.168.0.1 |
| Browser Admin Page | Not Available |
| Login Method | eero App (iOS / Android) |
| Account Options | Amazon Account eero Account |
| Authentication | One-Time Verification Code (No Stored Password) |
| App Download | Apple App Store Google Play Amazon Appstore |
Eero Model Comparison
← Scroll to see full table →
| Model | WiFi Standard | Max Speed | Coverage | Standout Feature |
|---|---|---|---|---|
| eero (2nd Gen) | Wi-Fi 5 | 350 Mbps |
1,500 sq ft | Budget Option |
| eero 6 | Wi-Fi 6 | 900 Mbps |
1,500 sq ft | Zigbee Smart Home Hub |
| eero 6+ | Wi-Fi 6 | 1 Gbps |
1,500 sq ft | 160 MHz Channels |
| eero Pro 6 | Wi-Fi 6 Tri-Band | 1 Gbps |
2,000 sq ft | Dedicated Backhaul |
| eero Pro 6E | Wi-Fi 6E Tri-Band | 2.3 Gbps |
2,000 sq ft | 6 GHz Band Access |
| eero Pro 7 | Wi-Fi 7 Tri-Band | 5 Gbps |
2,000 sq ft | Newest Model |
All eero models support WPA2 encryption by default. WPA3 is available on eero 6 and newer as an eero Labs feature — enable it under Settings → Advanced Settings → WPA3. If you’re not sure which is right for your network, our WPA2 vs WPA3 guide breaks it down without the jargon.
How to Change Your Eero WiFi Password
- Open the eero app and log in
- Tap Settings (bottom-right)
- Tap Network Settings
- Tap WiFi Name & Password
- Tap the password field and type your new password
- Tap Save
Your devices will drop off the network briefly while the change applies. You’ll need to reconnect each one — phones, laptops, smart TVs, smart home devices — using the new password. If you have a lot of devices, set aside a few minutes for that.
Eero Login Troubleshooting
App won’t log you in
The most common cause: your phone doesn’t have mobile data on. The eero app needs to reach eero’s cloud to authenticate your account. If you’re on a home WiFi network with no internet yet, or if mobile data is off, the login will fail. Turn on mobile data and try again.
Verification code not arriving
Check your spam folder if you used an email address. If you used a phone number, double-check the number is correct — there’s no way to see what number eero has on file from the login screen, but you can request a new code. If nothing arrives after a couple of minutes, try switching from SMS to email or vice versa.
Wrong Amazon account linked to your eero
Eero links to one Amazon account per network. If someone else set up your eero using their Amazon account — a family member, a previous owner, whoever — your network is registered under that account. Contact eero support at support@eero.com or call 1-877-659-2347. They can help with account ownership transfers.
Can’t remember which email you used
Try your most common email addresses on the eero login screen. If none work, eero support can identify the account linked to your specific eero device — just have the serial number ready. It’s printed on a sticker on the bottom of your eero.
App not supported on your device
Eero requires iOS 15 or later, or Android 8.0 or later. If your phone is older than that, the app may not install or may not work correctly. Your only real option in that case is to borrow a newer device to manage the network, or try the BlueStacks emulator on a PC.
How to Factory Reset Your Eero Router
If you’re fully locked out — wrong account, lost phone, can’t receive a verification code — a factory reset gets you back to square one. There are two types.
Soft Reset (keeps your account, clears WiFi settings)
- Find the reset button on your eero (back of the device on most models; side on eero Beacon)
- Press and hold for 7–15 seconds
- Release when the LED flashes yellow
- Wait for the LED to return to solid white — the reset is done
A soft reset clears your WiFi name and password but keeps the eero linked to your account. You’ll need to reconfigure your network through the app.
Hard Reset (full factory reset, removes from account)
- Press and hold the reset button for 15+ seconds
- Keep holding until the LED flashes red
- Release — the LED will then flash blue, meaning the device is ready to set up fresh
- Open the eero app and go through setup from the beginning
A hard reset wipes everything. The eero gets removed from your account entirely. You’ll need to create a new network in the app from scratch. Understanding how DHCP assigns IP addresses can help you make sense of what the app configures automatically during that process.
What You Can Control in the Eero App
Once you’re logged in, here’s what the app gives you access to:
- WiFi name and password — change your SSID and network password any time
- Guest network — create a separate guest WiFi network that keeps visitors off your main network
- Device profiles — set schedules, pause internet per device, add content filters for kids
- Port forwarding — open specific ports for gaming consoles, home servers, or smart home devices
- DHCP range — adjust the IP address range your router assigns to connected devices
- DNS settings — switch from automatic DNS to a custom server like 1.1.1.1 or 8.8.8.8
- WPA3 — enable stronger encryption on eero 6 and newer models
- Firmware version — eero updates automatically, but you can check the current version under Settings → Software Version
Most of these live under Settings → Advanced Settings. The interface keeps things simple on the surface, but the depth is there when you need it.
Wrapping Up
Eero router login works through the app — full stop. There’s no browser page, no IP address to type, no username and password box. Download the eero app, sign in with your Amazon or eero account, and you’ve got complete control of your network from your phone.
If login fails, check your mobile data connection first. If you’re fully locked out, the hard reset option gets you back in a few minutes, though you’ll need to set up your network from scratch.
For help finding your router’s exact gateway IP or checking what devices are on your network, our how to find your router’s IP address guide is a useful next step.